Thursday, August 27, 2009

Troubleshooting Tips for Woodworkers

Loading Quickly


  • Excessive sanding pressure

  • Inadequate dust exhaust

  • Excessive belt speed

  • Moisture content of wood too high


Abrasives Dulling Prematurely


  • Grit too fine

  • Excessive sanding pressure

  • Wrong product for application

  • Belt too stiff for application


Streaking of Workpiece


  • Belt loaded or dull

  • Sanding pressure too high

  • Dust on workpiece

  • Overloading due to glue lines or pitch material on workpiece

Thursday, August 20, 2009

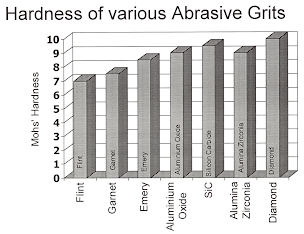
Abrasive Grit Chart

Click on the image to see it larger.

Miscellaneous Great Tips for Woodworkers


  • Sand lacquer finishes only after the 1st coat to remove dust nibs, runs, etc.

  • Sand lacquers also after the final coat to level the surface or as part of rubbing process if high gloss is desired

  • Sand varnishes such as polyurethane in between coats to give a rougher surface for the following coats to bond

  • Always sand with the grain

  • Wipe the surface of the work piece frequently with a soft, cloth or tack cloth

  • Use strong light to illuminate the work piece from an angle to see how the sanding is progressing

  • Keep sandpaper clean, either by belt cleaning stick or by tapping the sandpaper lightly

  • When sanding picture frames, sand the cross sections first, then sand the stiles

  • Final sanding on hardwoods is normally accomplished with 180 to 220 grit

  • Final sanding on softwoods is normally accomplished with 120 to 180 grit range

  • When bare wood sanding, moisten the wood with a wet cloth and allow the surface to dry

  • Do the final sanding, then raise the grain, and then sand again with the same grit

  • Sanding sealers should be sanded with zinc stearated Silicon Carbide in grit ranges of 220 to 320

  • Foam sanding pads, Mac Mops, non-woven abrasive pads also work well when sanding sanding sealers