Showing posts with label Help Desk. Show all posts

Thursday, May 13, 2010

Coated Abrasive Safety Guidelines

  1. Eye protection should always be worn when using any machinery-operated abrasive product (A.N.S.I. Standard Z87.1). Body protection should also be worn whenever appropriate; arm guards, leather gloves, and aprons. Loose clothing, jewelry and hair should always be secured before using any powered machinery.

  2. Machinery should always be maintained in good working order. Proper electrical controls should be easily reached and in good working order. Safety guards on machines should never be removed. Machinery should be disconnected from the power source before making any abrasive or machine adjustments.

  3. Proper dust control is essential. Always observe OSHA regulations regarding dust collection. Dust masks are recommended to minimize dust inhalation. Dust collection systems should be properly maintained and cleaned frequently.

  4. Never use a coated abrasive product which is cut, creased, or otherwise damaged. Observe proper storage conditions.

  5. Proper machinery use:
    • Always run lap joint belts in proper direction.
    • Jog the machine to start abrasive belt tracking, rather than full-power starts.
    • If unusual ticking or bumping noises are heard on a running abrasive belt, check belt and machine for possible damage.
    • On offhand applications, present the workpiece to the abrasive belt below the center of a contact wheel.
    • Proper belt tension should always be maintained.
    • Belt tracking should be properly adjusted.


Safety

Thursday, August 27, 2009

Troubleshooting Tips for Woodworkers

Loading Quickly


  • Excessive sanding pressure

  • Inadequate dust exhaust

  • Excessive belt speed

  • Moisture content of wood too high


Abrasives Dulling Prematurely


  • Grit too fine

  • Excessive sanding pressure

  • Wrong product for application

  • Belt too stiff for application


Streaking of Workpiece


  • Belt loaded or dull

  • Sanding pressure too high

  • Dust on workpiece

  • Overloading due to glue lines or pitch material on workpiece

Thursday, August 20, 2009

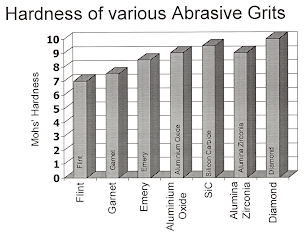
Abrasive Grit Chart

Click on the image to see it larger.

Miscellaneous Great Tips for Woodworkers


  • Sand lacquer finishes only after the 1st coat to remove dust nibs, runs, etc.

  • Sand lacquers also after the final coat to level the surface or as part of rubbing process if high gloss is desired

  • Sand varnishes such as polyurethane in between coats to give a rougher surface for the following coats to bond

  • Always sand with the grain

  • Wipe the surface of the work piece frequently with a soft, cloth or tack cloth

  • Use strong light to illuminate the work piece from an angle to see how the sanding is progressing

  • Keep sandpaper clean, either by belt cleaning stick or by tapping the sandpaper lightly

  • When sanding picture frames, sand the cross sections first, then sand the stiles

  • Final sanding on hardwoods is normally accomplished with 180 to 220 grit

  • Final sanding on softwoods is normally accomplished with 120 to 180 grit range

  • When bare wood sanding, moisten the wood with a wet cloth and allow the surface to dry

  • Do the final sanding, then raise the grain, and then sand again with the same grit

  • Sanding sealers should be sanded with zinc stearated Silicon Carbide in grit ranges of 220 to 320

  • Foam sanding pads, Mac Mops, non-woven abrasive pads also work well when sanding sanding sealers

Tuesday, July 21, 2009

General Applications for Coated Abrasives

Purpose of Sanding

  • Prepare the wood surface

  • Clean the wood surface

  • "Level out" the first coat of top coats

  • Promote good bond between coats on some type of finishes


Polishing

  • Final step in finishing using coated abrasives

  • 150 grit or finer

  • In woodworking, polishing is the final sanding of bare wood prior to staining or finish


Intermediate Sanding

  • Grit ranges from 50 to 120 grit

  • Stock removal is of medium quantity

  • Rule of thumb – Skip only one grit at a time


Rough Stock Removal

  • Woodworking requires dimensioning of lumber or glued panels to proper thickness

  • Grits 24, 36 and 40


Sanding of Penetrating Oils & Finishes

  • Bare wood should be sanded to at least 180 or 220 grit

  • Sanding beyond 220 will tend to burnish the wood surface

  • Pores will close and "slicken" the surface

  • Oil or stain penetration will decrease

  • Common to use 400, 600, 800, 1200 grit wet-or-dry Silicon Carbide sheets to "sand in" the oil or stain

  • Drives the stain or oil into pores of the wood and smoothes the wood surface as grain is raised

  • Grain raising is very common with water-based stains


Tips for Sanding Putty & Filler

  • Excess residue of fillers should be sanded with steel wool or a non-woven abrasive pad

  • After filler is fully dry, scuff sand with 220 grit Stearated sandpaper

  • On closed-grain woods, sand with 320 Stearate to reduce likelihood of cutting through the filler into bare wood

  • Putty should be sanded with 180 to 320 grit Stearated paper