
Tuesday, October 29, 2013
Cleaning Your HVLP Spray Gun
Learn how to clean your HVLP Spray Gun exclusively from Fuji! Also, feel free to download the documentation on cleaning an HVLP Spray Gun.
Monday, October 28, 2013
Monday, October 21, 2013
Customer Project - Bowl & Wands

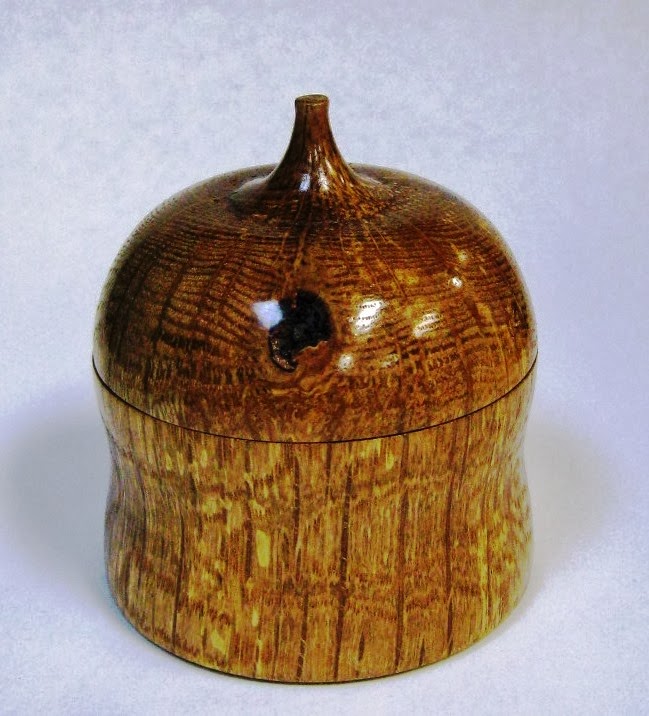
Small bowl by Sam Stitcher (2.625"H x 2.375"W) from a white ash tree cut down due to disease. The tree was over 100 years old and had emerald ash borers in it. You can see the damage from the larvae in the wood. This bowl was made from a limb.
(Click on the images to see them larger)

These are two magic wands made for Sam Stitcher's great grandchildren in WV. One is made from a birch dowel and the other from multi-color laminated wood, both from the Winston-Salem store. The finish on both is Formby's tung oil finish extra gloss.
Submit your Customer Project today @http://www.woodworkingshop.com/projects/
Tuesday, October 1, 2013
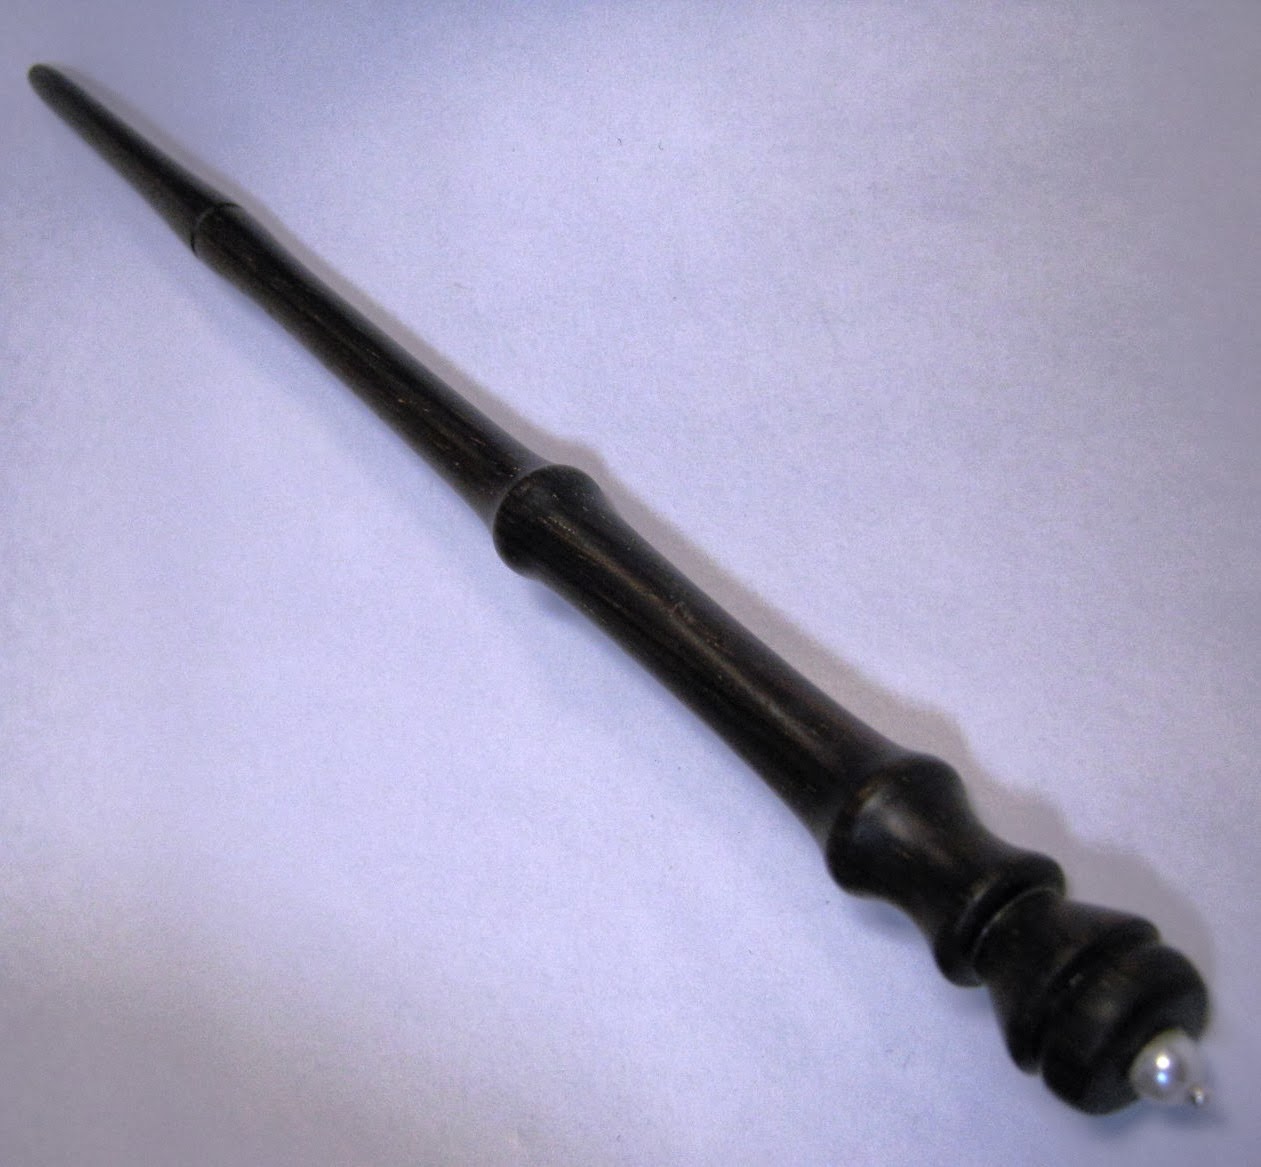
Customer Project - Bowl & Wand
Thanks to Sam Stitcher for his customer project submissions! Below is a small bowl made from the Tanglewood Wedding tree (oak). The bowl's lid has knots in it that give some interest to the bowl. And, also a wand made from cocobolo purchased from your Klingspor's Woodworking Shop in Winston-Salem. The blank was 1"x1"x12". The wand has a pearl in the butt end. Click on the images to see them larger.


Wednesday, September 18, 2013
Customer Project Submission
Here are two customer project submissions by Sam Stitcher! (Click photos to see them larger)
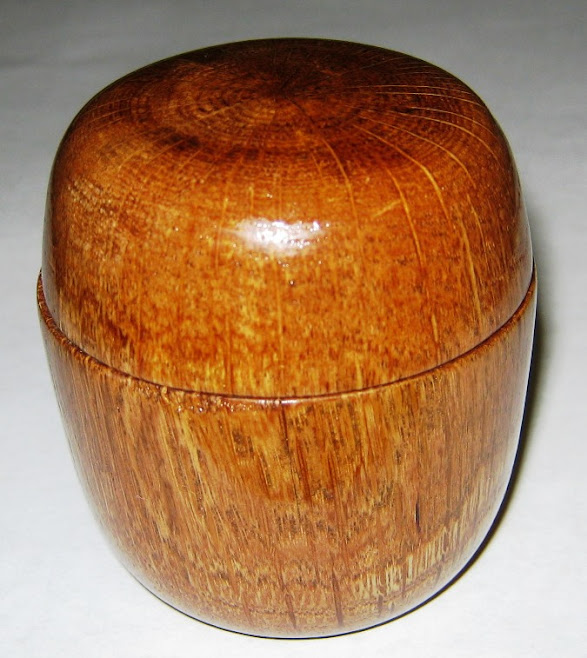

About : Sam made a small bowl that became a jewelry box for his wife. It is about 3" in diameter. The wood is oak from the fallen Tanglewood oak in Tanglewood park next to the manor. The inside is lined with felt in the top and bottom.

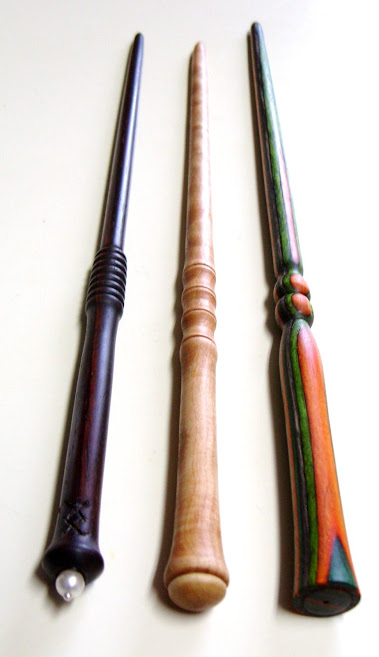
About : The photo shows three magic wands made from wood purchased from Klingspor's Woodworking Shop in Winston-Salem, NC. One is cocobolo, one is birch, and the third is a composite. All are about 12" long.
Tuesday, July 16, 2013
Nice Curves Part 2
Nice Curves Part 2: (Read Part 1)
Presented by Chris SmithThe 1/4" arbor makes using the Sanding Star a breeze. Simply chuck it in and you're off and sanding. With an operating maximum speed of 3,200 rpm, you will have no trouble controlling this little miracle. Think about your toughest profile and the Sanding Stars will make short work of those old headaches!
MINI MOPS are great for the small carving or other project where small detail sanding is required. This product is a great addition to woodworking shops and hobbyist tool boxes alike. Whether you are a carver needing to touch up small relief carvings or a metalworker needing to sand and polish in tiny places, these mini mops are the perfect answer. They work great for sanding in between cutouts on scroll work or inside holes. These are very versatile little sanding mops. Made from KLINGSPOR'S Famous GOLD flexible sanding material, these mops can be used on all Dremel, Proxxon, King Arthur, and Foredom type tools easily. They are available in 1”, 1-1/2”, and 2” and mount to a small 1/8” mandrel via a small screw. You can purchase the mega kit that includes one of each size and one of each grit if you prefer to have a variety of options.
SAND-O-FLEX is perfect for sanding contours, profiles and carved parts. The Sand-O-Flex wheel is a quick fix for these sanding problems. The abrasive flaps are backed by brushes that help to push the sandpaper into the desired surface shape. The slashed abrasive works great on more severe profiles and contours or for flat surfaces and minor contours. The replacement sandpaper is held conveniently in the center core of the wheel so when you need to "freshen" your sandpaper, simply pull it out of the core, like a weed eater spool, and cut off the old ends. The Sand-o-flex isn’t quite as versatile as the previously mentioned items, but does fill a need for certain contour sanding. The kit includes 100 grit sandpaper, but other grits from 80 to 320 are available. Do NOT exceed 2,400 RPM when operating the Sand-O-Flex.
GUINEVERE sanding system is a miniature sanding system that actually conforms to the shape you are sanding. Guinevere starts with a quiet 1/2HP (300watt) motor and offers a versatile, custom selection of inflatable rubber sanders and sleeves. Guinevere is a revolutionary sanding system that is the perfect compliment to our line of carving blades, carbide shaping discs, flap disc sanders and miniature carving sets.
This system of inflatable sanders adapts to the shape of your work, from concave to convex, angled or flat. It is perfect for sanding bowls, carvings, or any other project that has uneven surfaces. The long life sanding cloth sleeves allow you to quickly change between different combinations of sanders and grits. The kit includes a Sanding & Polishing Motor, Flexible Shaft, and a Basic Sanding Kit, which includes a hand pump, round dome sander w/ 4 sleeves, 1-5/8" x 1-3/4" drum sander w/ 4 sleeves, cleaning stick, chuck key, and instruction manual. Most of the components can be purchased separately as well in the kit listed above.
The flex shaft allows you to reach into a project where stationary units will not. It will allow you to reach the hard-to-reach areas and will hold up to great to the abuse that both production and home use will throw at it.
Mount the drums and sleeves directly to the unit and hold on to your project with both hands for a more secure sanding and buffing experience.
GUINEVERE® offers a variety of profiles to achieve whatever your needs are. With three straight drum sizes and two ball end sanders, you will find unlimited use with the Guinevere system. The inflatable sanders are pumped up through an air inlet in the drive shaft located in the bottom of each sander. The air valve design leaves the bottom flat with out a clumsy protruding valve on the sanders.
This solution allows the bulb to constantly flex and change shape, making the sanders soft all the way to the edge. Fit each bulb with custom sanding sleeves and polish cloths to achieve a velvet soft finish not possible with hand sanding. The sanders become flat when pressed against a flat surface and round when pressed against a round surface, easily conforming to the shape they touch. Consequently the sanders should be filled with very little air. Because of these features, there are many places where the GUINEVERE® sanding system can be used. The motor runs at 3600 rpm so some of the Klingspor mops can be chucked in and used on this system as well.
TADPOLE sanders are the way to go if power sanding isn't for you. The tadpole sanders are great for angles, edges, corners and curves. Just wrap sandpaper around these flexible rubber shapes and sand your concave and convex surfaces and profiles without a worry of sanding away any desired contours. Get into a variety of angles with the pre-shaped angled heads of 30, 45, 60 and 90 degrees. This is perfect for furniture, toys, molding, etc. and uses paper or adhesive sheets, which is typical scrap paper you will find laying around the shop. It will sand one shape at a time, unlike some of the other items mentioned earlier, but it does allow for more control over what you are sanding and the pressure that is applied.
SOFT SANDERS is a pack of six blocks of three different densities, which vary in firmness and yet all are soft enough to be distorted or compressed into places that are hard to sand. Every single curve and surface on each block has been designed for a purpose. Soft, rounded edges virtually eliminate gouging. Blocks glide over varying surface levels like a carwash mitt without flipping over. The zero-fatigue blocks are super lightweight and designed to be comfortable no matter how you hold them. Soft Sanders are soft & pliable yet extremely durable plus are resistant to most solvents. Tapered edges of the blocks allow you to sand up to and underneath those hard-to-access areas. The Corner-N -Cove™ block with its offset handle allows for a clear view of the surface being sanded. Wrap on the cloth backed sheets in the grit that is needed and sand away.
CURV A FLEX is one of the most versatile hand sanders on the market today. Virtually any shape from grooves to dowels to turning can be easily sanded with the CURV-A-FLEX. The sander "locks" the sandpaper in so there's no crimping or creasing that could ruin you work piece. Wrap the sandpaper around the outside or use it on the inside to sand rounded objects. Curv a flex may be used wet or dry with any half sheet.
If you have any questions regarding any of the sanding solutions listed above, please call Klingspor's Woodworking Shop customer service representatives for assistance at 800-228-0000.
Wednesday, June 5, 2013
Nice Curves Part 1
Nice Curves:
Sanding contour shapes with ease.Presented by Chris Smith
Have you ever met the frustration of having to sand raised panel doors, or the multi-profiles of crown and other types of molding? Or maybe you have had to grab a dowel and wrap it with sandpaper and fight to sand the flutes of a column. Regardless of the project, there is almost always some part of it that requires sanding of contours or needs special attention that a disc or sheet sander won’t give. It is always the most dreaded part of the project because it usually means elbow grease and time. And it is usually at this point in the project you are ready to be done, but it is also the part of the project that can make or break all the work and time you have invested. If your project has a bad sanding job it can reveal itself when the finish is applied, which we have all experienced at least one time. Sanding contours doesn’t have to be a burden. In this article you will learn easier and in most cases better ways to sand those odd shapes with ease.
Klingspor's Woodworking Shop understands the need for specialty abrasives to achieve a high level of speed and quality when sanding. This is why we have devoted an entire section to Contour sanding on our website. The following is a list of items perfect for a variety of contour sanding and shaping needs.
MAC MOPS are perfect for turnings, carvings, chair arms and legs, balusters, and other shaped and contoured parts. They can be sanded easier, better, and faster when using the Mac Mop. It consists of hundreds of strips of flexible sandpaper that are bonded to a strong epoxy core. These small strips, made from our cloth-backed Aluminum Oxide material quickly find their way into all the recesses in your piece. Due to the nature and design of the Mac Mop, the sanding action is very passive and will sand, polish, and defuzz your work without affecting or altering any of the profile. The Mac Mop will definitely improve the finish stages of your project by sanding off all the loose fibers that have been pressed into the wood during previous milling or sanding applications. They will work great on larger projects like table legs or crown molding and will also work equally as well on smaller projects. This will, in turn make for a smoother first coat of finish to build on. Simply consider this the best profile sanding device on the market today. We offer the Mac Mops in a 10"x2" and a 10"x4" size and in 80, 120, and 180 grits.
Mac Mops should be mounted onto stationary machines with motors ranging from 1/2 hp to 3 hp and shafts of at least 1/2" diameter and long enough to allow the mop to be mounted. Ideal speeds for the Mac Mop are between 1,100 and 2,500 rpm's but should never exceed 3,400 rpm's. The mops are available in kits that include mounting plates to fit most any size mandrel or arbor ranging from 1/2" to 1-1/2".
SPINDLE MOUNTED SANDING MOPS are a smaller version of the MAC MOP, but come mounted on a 1/4" spindle. With these sanding mops, the most severe shapes and profiles can be sanded with ease. Best of all, no fancy equipment is needed to use them; any 1/4" tool will work. Hundreds of abrasive "fingers" find their way into hard-to-reach nooks and crannies to give the best possible sanded finish. Simply chuck into a 1/4" drill and you're ready to go. They offer the same sanding versatility as their bigger counterpart, but because they are able to be chucked into a variety of other tools and machines, they make a great addition to the home shop as well as the professional cabinet shop.
The mops are 7" inches in diameter and are available in 1" and 2" widths. With a variety of grits ranging from 80, 120, 180, and 240, any job can be sanded from the first pass to the finish.
GOLD SANDING MOPS (also known as flutter sheets) are perfect for the medium to smaller profile sanding needs like parquetry, scroll work, moldings, carvings, etc. They are a smaller version of the Mac Mop and Spindle Mounted sanding mop. If you have ever asked yourself, "How do I sand a profile without changing the shape?" Well, the Sanding Mop Kit is the answer. Woodworkers from across the country that have tried the gold mops will tell you that this is the very best contour sanding system on the market today. They are made of the most flexible aluminum oxide cloth available with lubricants and special resins added. You'll be amazed at the time you will save and the finish in which you can achieve. The fingers of the gold mops will act like a chamois in a car wash and find the low spots, leaving contours and profiles sanded smooth top to bottom, without ruining any detail. You can build the perfect sanding mop for your specific profile sanding needs by adding or taking away sheets. This is a must have for all woodworking shops. They have a 1/2" hole in the middle and can be mounted to any number of mandrels that fit drill presses, motor arbors, hand drills, flex shafts and more.
The Gold mop is perfect for sanding the multi-profile design of crown molding, edge molding, beads, coves, panel doors, and much more. The profile sanding possibilities are endless because of this unique finger design. The sanding mop refills come in packs of 48 sheets that are placed on the mandrel in an intersecting pattern by placing two sheets back to back on the mandrel. Then, place two more sheets back to back and install on them mandrel, intersecting the previous sheets making a cross. Continue installing the sheets on the mandrel in this back to back method, with each layer crossing the other in a pin wheel design until the desired thickness is achieved. The easy to follow instructions (Link is a PDF download file. Requires Acrobat Reader, a browser plug-in, or third party software to view) can be downloaded from the Klingspor’s Woodworking Shop website. You can use small spacers between the sheets to allow for more flexibility of the mops or to increase the width. The sanding mops are available in two sizes (1"x4" and 2"x6") and in grits ranging from 80 to 320. For best results, don’t exceed 2300 rpm when using these mops.
SANDING STARS are a smaller version of the Sanding Mop and come preassembled on a 1/4" mandrel. Put these to work on your most severe profiles, radiuses, routed edges and carved surfaces. The "Sanding Star" is made of the Klingspor gold material - an extremely flexible, cloth-backed aluminum oxide abrasive with a special dry lubricant applied. This special "golden" material is excellent for finish-sanding in general, but perfect for those tough-to-reach areas you never thought you would be able to sand. The sanding Stars are 4” in diameter and 1/2" to 3/4" in thickness and are available in grits ranging from 80 to 220. This size allows you to reach into tighter areas than the previously mentioned profile sanding products.
Hey, stick around...there's more of this article coming next month!...To be Continued...
In the meantime, enjoy a video presented by Chris Smith about Mac Mops!
About Chris Smith
Chris began his woodworking career early while in high school. With three years of woodshop class under his belt, he graduated in 1993 and then began work for a cabinet shop.
His work in the cabinet shop spanned over several years. He continued his skills in cabinetry on his own before joining Klingspor’s Woodworking Shop in 2001.
He found an immediate interest in woodturning while at Klingspor. But, for Chris, it is more than just woodturning as he finds enjoyment in all aspects of woodworking. He has a wealth of 20 years experience in cabinetmaking, furniture building, woodturning, and more.
Friday, February 15, 2013
Creating Amazing Furniture
What You See Is What You Do:
Creating amazing furniture pieces from things you see everyday. Read on do-it-yourself pioneers!What dreams may come
Have you ever seen something around your house, or while your out driving around
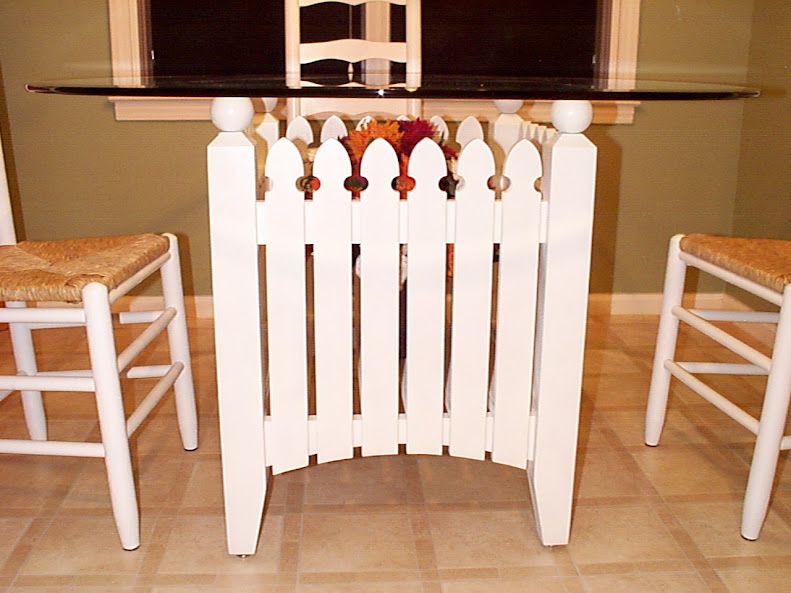 and thought to yourself, "That would be a cool piece of furniture?" That happens to me all the time. I figured I was the only one who thought like this until a friend showed up with a picture of a picket fence with flowers in front of it and said, "I want a dining table that looks like this, can you build it?" Well, being I love a challenge, I said, "SURE CAN." I should have thought about my answer, but I couldn't resist an opportunity to challenge my creativity. I will have more on this later.
Know your limits
Ideas like the "picket fence table" might sound strange to some (and it really is), but I love breaking away from the norm. The key is to not limit yourself to "a set of plans in a magazine" or "an exact set of measurements taken from something someone else has already done." I don't mean to say that it's not good to reference plans or get the complete instructions from Norm Abram’s latest project, but if you love woodworking like I do, let the creative juices flow. You might find that you like your version (or vision) of a project better. That's why it's called custom woodworking.
Anyway, back to my picket fence table dilemma. My first problem was to figure out how in the world you make a nice inside dining table resemble something designed to keep your dog (or children) from terrorizing the neighbors? My answer came while I was driving. I noticed that most picket fences looked the same. Most were painted, had a specific design on the picket, a decorative top to the post, and were meant to look nice and welcoming from the outside. I knew then I could achieve all of these needs while transforming this fence into something that someone would look forward to eating from every day.
Sizing things up
I knew the size (height, width, & depth) the table needed to be, so I worked backwards from there. You will need to do the same thing with your project. Know what the final parameters are, then take your grand idea and convert it to meet your needs. I knew the common dimensions of the post size used for fences is a 4"x4" and pickets are usually 1"x4", so I scaled everything down from there.
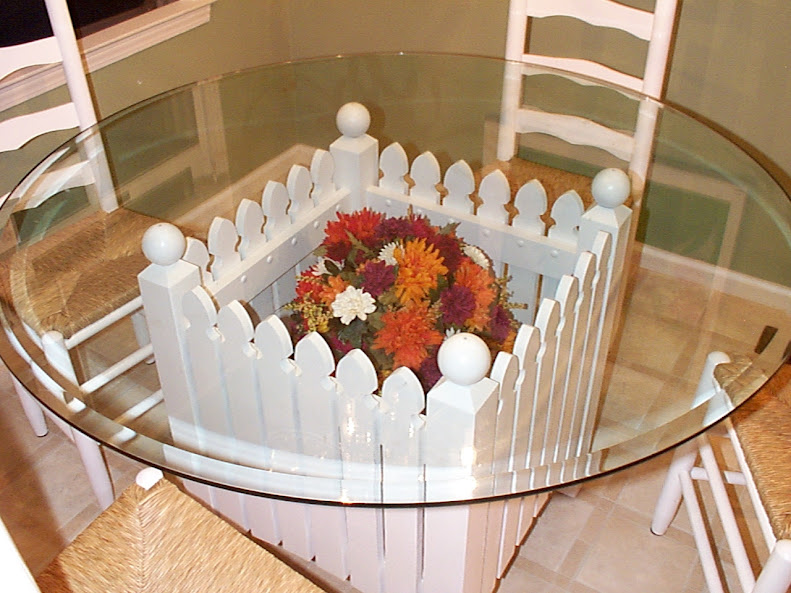 After much trial and error on paper and on patterns, I weeded out things that didn’t make this table a desirable family attraction. I didn’t like the flat, tapered post design, so I went with a ball topper instead. I also didn’t care for the flat look or simple bevel on the picket. I went with more of an arrow style with an arched bottom to mimic what is normally a design for the top of the fence. The customer originally just wanted the fence table, but what drew him to get a photo was the pleasant and welcoming appearance that the flowers in front of the fence gave. After discussing with the client, he (his wife actually) fell in love with the idea of creating a flower arrangement for the center piece inside the table. This was an indoor dining table, so they decided to use a fake flower setting that could be changed depending upon the mood or season.
Turning your dreams into reality
At this point it was time to take what were once merely thoughts on paper and transform it into reality. I cut the pattern for the pickets, milled them, and laid them out, striving for an aesthetically pleasing appearance that would fit the dimensions needed. I then screwed them on from the back, using round buttons (for decoration) to cover the holes. I placed slats with a small gap like the pickets as a shelf for the flowers (this was done in case they decided to use real ones that required water). I used a mortise and tenon joint to assemble the sides together and flattened the ball tops. Then I finished top off with a clear door bumper to keep the top from sliding. As you can see in the photos, it turned out quite nice and the customers loved it.
I have long since thought of modifications I could use to make the table better, such as a hinged panel to access the flowers easier, mounting the base on casters to make moving to other locations more accessible, and other random ideas that will have to wait for the next model to roll off the floor.
This project could have easily turned from a dream into a nightmare, but with patience and a willingness to adapt, it became one of my favorite projects. Who would think that an afternoon drive could lead to your next woodworking project? Let your imagination run wild with ideas and think about the whole project before you jump in too deep. If you hit a bump in the road (not just on your drive), step back and work through it. The end result will be one that you can be proud of and will take your skills to the next level.
About Chris Smith
Chris began his woodworking career early while in high school. With three years of woodshop class under his belt, he graduated in 1993 and then began work for a cabinet shop.
His work in the cabinet shop spanned over several years. He continued his skills in cabinetry on his own before joining Klingspor’s Woodworking Shop in 2001.
He found an immediate interest in woodturning while at Klingspor. But, for Chris, it is more than just woodturning as he finds enjoyment in all aspects of woodworking. He has a wealth of 20 years experience in cabinetmaking, furniture building, woodturning, and more.
Tuesday, January 15, 2013
Little Shop of Horrors Part 3
Little Shop of Horrors:
Shop Safety
This is the third and final part of the Little Shop of Horrors. Hope you enjoy!Using the great line that Norm Abrams made popular at the start of his show The New Yankee Workshop, "Before we use any power tools, let's take a moment to talk about shop safety. Be sure to read, understand, and follow all the safety rules that come with your power tools. Knowing how to use your power tools properly will greatly reduce the risk of personal injury. And remember this: there is no more important safety rule than to wear these - safety glasses." This is inevitably the most overlooked part of setting up a shop, but yet probably the most important. What good is a shop full of tools if you are injured and can't use them? You should keep this in mind when purchasing tools and machines.
Several years ago a man named Steve Gass saw the need for a safer table saw, so he set out to create one. He succeeded and now the SawStop is one of the top selling saws in the U.S. If you haven’t heard about this tool then you need to check them out at sawstop.com. It uses flesh detecting technology that will recognize your fingers if they touch the blade and will totally shut down and the blade will drop below the surface of the table, saving you the loss of a finger and a trip to the emergency room with months of physical therapy. I have demoed this machine myself many times (using a hot dog, not my finger) and it has impressed me every time and never failed to do what it says. Klingspor’s Woodworking Shop offers this saw, in all its models, through our retail stores only.
Machines aren't the only area of safety that needs to be reviewed. There are many areas we need to be safe and protect ourselves. No more important safety rule...safety glasses. I have been to the eye doctor many times due to metal, wood, or other foreign objects stuck in my eye, which I couldn't get out. When I was younger, my dad was pulling rusty nails out of some boards and one came out and flew across the driveway and hit me in the eye. I couldn't see out of it for days. You would have thought I would have learned my lesson, but it took me a long time, as I am very stubborn, to realize I need to protect my eyes and ears. I now where safety glasses anytime I am in the shop working or doing any type of work overhead, like working under a sink or on a ceiling. Keeping your eyes safe should be very important to you.
Using machinery or power tools can affect your hearing too. Routers, planers, and jointers can be very loud and can contribute to hearing loss, so be sure to have some hearing protection available.
There are many other areas in which you should consider using safety aids, such as while working with a table saw or other machines. Please use the guards that came with your tools, as well as push sticks, feather boards, etc.
Other safety items include dust masks, face shields, gloves, aprons, etc. Please check out our full line of safety equipment and accessories on our website.
In conclusion
Don’t make excuses about not having room for tools. Just get creative and make your shop size work for you. When setting it up do a lot of research to find the tools and machines that are right for you. And always use safety equipment to protect yourself from injury. I worked in our Hickory retail store for over ten years and saw a LOT of different types of injuries from people performing stupid, unsafe operations. I also saw some accidents that occurred simply because the wood or the tool did something unexpected. So be safe and have fun.
Good luck and happy woodworking.
About Chris Smith
Chris began his woodworking career early while in high school. With three years of woodshop class under his belt, he graduated in 1993 and then began work for a cabinet shop.
His work in the cabinet shop spanned over several years. He continued his skills in cabinetry on his own before joining Klingspor’s Woodworking Shop in 2001.
He found an immediate interest in woodturning while at Klingspor. But, for Chris, it is more than just woodturning as he finds enjoyment in all aspects of woodworking. He has a wealth of 20 years experience in cabinetmaking, furniture building, woodturning, and more.
Wednesday, January 9, 2013
Walking Sticks & Slingshot
Many thanks to Jeff Pack (Wood Works) Dallas , NC for sharing his customer projects with us! He shared with us a Wizard face Slingshot and Vine Twisted Walking Sticks. Enjoy his creativity and talent below.


Subscribe to:
Posts (Atom)