Wednesday, October 14, 2009

Bill's Custom Woodworks

Master Craftsman Bill Rafferty handcrafts Curio Cabinets one at a time. Being in business for over 20 years, He offers the highest standard of quality control. Bill specializes in Curio Cabinets with mirror back & adjustable glass shelves popular with collectors and businesses for displaying collectibles. All Curio Cabinets are built from solid oak in the traditional style with modern day touches to showcase any collection in style. Color selections include Aged Oak, Dark Walnut, Golden Oak, Honey Maple, or White Wash.

Learn more about Bill’s Custom Woodworks by visiting him online @ http://www.billscustomwoodworks.com.

Wednesday, September 2, 2009

Sachs Woodcrafts Portfolio & Gallery


When you have a chance, browse to Sachs Woodcrafts online. You’ll see finely crafted products such as turned bowls, bottle stops, cutting boards, and much more. Each work of art is hand crafted and unique in expressing character and charm.

“The Bowl Man” as he is called, also accepts special requests, works with a wide array of wood species turning them into custom designs that make for a perfect gift. He obtains some of his supplies from our very own Klingspor’s Woodworking Shop in Raleigh!

Visit Sachs Woodcrafts and browse the Products, Gallery, Partners, or FAQs. You may even want to read or sign the guestbook.

Thursday, August 27, 2009

Troubleshooting Tips for Woodworkers

Loading Quickly


  • Excessive sanding pressure

  • Inadequate dust exhaust

  • Excessive belt speed

  • Moisture content of wood too high


Abrasives Dulling Prematurely


  • Grit too fine

  • Excessive sanding pressure

  • Wrong product for application

  • Belt too stiff for application


Streaking of Workpiece


  • Belt loaded or dull

  • Sanding pressure too high

  • Dust on workpiece

  • Overloading due to glue lines or pitch material on workpiece

Thursday, August 20, 2009

Abrasive Grit Chart

Click on the image to see it larger.

Miscellaneous Great Tips for Woodworkers


  • Sand lacquer finishes only after the 1st coat to remove dust nibs, runs, etc.

  • Sand lacquers also after the final coat to level the surface or as part of rubbing process if high gloss is desired

  • Sand varnishes such as polyurethane in between coats to give a rougher surface for the following coats to bond

  • Always sand with the grain

  • Wipe the surface of the work piece frequently with a soft, cloth or tack cloth

  • Use strong light to illuminate the work piece from an angle to see how the sanding is progressing

  • Keep sandpaper clean, either by belt cleaning stick or by tapping the sandpaper lightly

  • When sanding picture frames, sand the cross sections first, then sand the stiles

  • Final sanding on hardwoods is normally accomplished with 180 to 220 grit

  • Final sanding on softwoods is normally accomplished with 120 to 180 grit range

  • When bare wood sanding, moisten the wood with a wet cloth and allow the surface to dry

  • Do the final sanding, then raise the grain, and then sand again with the same grit

  • Sanding sealers should be sanded with zinc stearated Silicon Carbide in grit ranges of 220 to 320

  • Foam sanding pads, Mac Mops, non-woven abrasive pads also work well when sanding sanding sealers

Tuesday, July 21, 2009

General Applications for Coated Abrasives

Purpose of Sanding

  • Prepare the wood surface

  • Clean the wood surface

  • "Level out" the first coat of top coats

  • Promote good bond between coats on some type of finishes


Polishing

  • Final step in finishing using coated abrasives

  • 150 grit or finer

  • In woodworking, polishing is the final sanding of bare wood prior to staining or finish


Intermediate Sanding

  • Grit ranges from 50 to 120 grit

  • Stock removal is of medium quantity

  • Rule of thumb – Skip only one grit at a time


Rough Stock Removal

  • Woodworking requires dimensioning of lumber or glued panels to proper thickness

  • Grits 24, 36 and 40


Sanding of Penetrating Oils & Finishes

  • Bare wood should be sanded to at least 180 or 220 grit

  • Sanding beyond 220 will tend to burnish the wood surface

  • Pores will close and "slicken" the surface

  • Oil or stain penetration will decrease

  • Common to use 400, 600, 800, 1200 grit wet-or-dry Silicon Carbide sheets to "sand in" the oil or stain

  • Drives the stain or oil into pores of the wood and smoothes the wood surface as grain is raised

  • Grain raising is very common with water-based stains


Tips for Sanding Putty & Filler

  • Excess residue of fillers should be sanded with steel wool or a non-woven abrasive pad

  • After filler is fully dry, scuff sand with 220 grit Stearated sandpaper

  • On closed-grain woods, sand with 320 Stearate to reduce likelihood of cutting through the filler into bare wood

  • Putty should be sanded with 180 to 320 grit Stearated paper

Friday, May 1, 2009

Sanding – Finishing Facts

• Sanding and finishing is the least favorite steps when surveying woodworkers
• Sanding and finishing is the absolute most important steps in a project
• Remember: First impression of your project is the most important
• First thing seen: Quality of the finish

Tuesday, March 31, 2009

Board Foot Calculator


Click image to see it larger.

Monday, February 23, 2009

Abrasive Grade Comparison

Throughout the past twenty years as a woodworking industry leader, we have received a lot of questions about abrasives. One of the top questions is how we grade our sandpaper. This question comes up because ours in some cases, might feel a little different compared to another with the
same grit number.

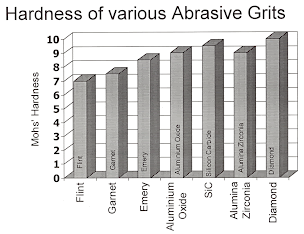
There are four main categories of abrasive grades available in today's market. Klingspor's Woodworking Shop uses the "P" grading system, or the Federation of European Producers of Abrasives (FEPA), which is used by almost all European abrasive manufacturers and like the metric system, is now being implemented by virtually all manufacturers around the world - including the US manufacturers. Simply look for a "P" preceding the grit number on the backing of your abrasive. If it's "P" graded, it should have this designation. Another common scale used to be called the Coated Abrasives Manufacturers Institute (CAMI) scale. This was primarily used by US manufacturers, but is being phased out by most. The CAMI scale has some slight differences to the P-grade scale in the finer grits, so attention should be paid above 220 grit in some instances. A third grading system used is the Micron scale, normally used with a product that is film-backed. The fourth scale is the old Aught scale,which was used many years ago and is still seen in some floor sanding abrasive applications.

See our online chart for the scales and how they compare to one another. Klingspor's Woodworking Shop carries almost every grit in every material, depending on the type. So you'll be able to better "fine-tune" your sanding application.
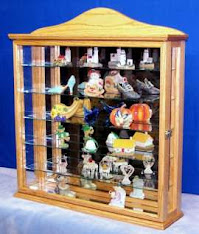