Monday, October 31, 2011

Important Shellac Information

About Shellac
Shellac is an excellent quick drying non-waterproof Child-Safe finish. Flake form allows fresh shellac to be prepared and avoids waste. Use shellac to seal in sap, resin, grease or oil marks after cleaning and prior to painting or lacquering.

Thinned shellac (1/2 to 3/4 pound cut) makes an excellent stain barrier coat or hold out coat especially on soft woods and difficult or end grain prior to using a pigmented stain.

Dissolving & Mixing Flake Shellac
Mix what will be used within 3-6 months. Mix in a dark plastic or glass container with a tightly fitting lid. Soak the flake shellac in about 1/2 of the total alcohol to be used for 24 hours or longer (cool room temperatures will slow the process; pulverize button shellac to speed dissolving) stir occasionally and when dissolved add the balance of the alcohol. The consistency of shellac is designed by "cut". A 2 pound cut is two pounds of shellac flake in one gallon (or 1/2 pound shellac in one quart) BEHKOL Denatured Alcohol.

For first experiences with shellac it is recommended that you start with a light consistency, preferably about a 1 pound - 1.5 pound cut. A one pound cut is (1 pound of flake to 1 gallon) or (1/4 pound in a quart) of Denatured Alcohol.

To mix 1 pint of 1 pound cut liquid shellac use approximately a 2:16 ratio of shellac flakes to alcohol (2 ounce of shellac flakes dissolved in 16 ounce of alcohol). Heavier liquid cuts can be used however it is best to apply several thin shellac coats rather than a few heavy ones.

After the shellac is fully dissolved, it should be strained through fine mesh cheesecloth to remove any impurities. Shellac is made from the lac bug and a few bits of bug carcass or packaging are often left in the dry shellac resin. Before the liquid shellac is used, it should be stirred thoroughly.

Different shellacs may be intermixed in the liquid state to adjust color tone or shades.

Shellac Application
When used as an under-coater prior to other finishes, use a Dewaxed shellac. Shellac should be applied in long strokes with the grain. Shellac requires some practice in order to be used to its full potential. Dip a good natural bristle brush about half way into the shellac and gently clear excess shellac against the side of the container, this gives a reasonably filled brush for full strokes without incorporating air in the shellac. Allow each coat to dry thoroughly. Shellac should be sanded as necessary between coats.

If the shellac is dry, sanding will produce a fine powder on the surface. If the shellac is not dry, it will be somewhat tacky and the paper will clog. After sanding, wipe the piece thoroughly with a tack cloth and recoat. Depending upon temperature and humidity conditions, allow from two to six hours drying for each coat. Some craftsmen prefer to do their finish sanding on raw wood after first giving it a coat of shellac as this stiffens the wood fibers and allows any rough portions to be easily sanded.

When thoroughly cured the finish can be rubbed out with oil free & long stranded #0000 Steel Wool or fine pumice with paraffin oil. Rubbing should always be done with the grain. 24 hours after the final rubbing, to protect your shellac finish, apply a thin coat of paste wax. Allow the wax to dry completely and buff with a soft cotton cloth.

Storage
Store mixed shellac: tightly sealed & cool, and in a dark place if a clear container is used.
Store Flake: tightly sealed, cool, and dark.
Test all older shellac mixtures (if several months old) for drying. If the surface stays tacky after 8 hours and does not sand freely without gumming, the shellac is old and will not cure hard and must be discarded.

"Packing" or "Blocking"
Dewaxed shellac flake when exposed to high heat and/or humidity tends to "block" or pack together in small, or occasionally, large chunks or "blocks". To avoid blocking: store shellac flake tightly sealed in a cool, dry location (under 70°F).

NOTE: Blocking is not detrimental to the shellac flake.

If the flake blocks, wrap larger chunks in cloth or thick plastic sheeting, to keep them from flying all over the room, and reduce them to manageable size with a hammer or dead blow mallet.

The finest flakes are imported via air to avoid blocking however there is little control if the product is delayed in a delivery van or air container on a hot day.

More Shellac Guidelines
Use Behlen BEHKOL™ or a high-test denatured alcohol (10% denaturants or less).

If the label does not say, the MSDS sheet for the brand will have the mixture percentages. A 190 proof denatured alcohol has 5% denaturant.

  • A warm environment will aid the alcohol in dissolving flake. NEVER place alcohol or shellac on or near any source of heat. In a cooler room, set the lidded bottle of dissolving shellac flake in a container of hot (not boiling) water to aid in dissolving.
  • Strain the working shellac solution through layers of cloth to remove any particles of dirt or organic material.
  • Evaluate flake color when in liquid, variation in flake thickness from production batches can make a thinner flake look lighter in tone. Slight seasonal variations do occur in a natural product but they will be within the laboratory acceptable color range.
  • Blending Flake Colors or Tones: Any of the shellacs may be intermixed or inter-layered. For repeatable results, blend shellac colors only in liquid form.

Monday, April 11, 2011

Woodturning Basics

Woodworking 101

Woodturning Basics

by Scott Ollis


Traditional furniture and kitchenware often include turned parts. The parts are produced on a wood lathe. The wood is rotated about a horizontal axis while being shaped by a tool that is hand-held in a fixed relation to the wood.


The hand wood lathe combines the skill of hand-tool work with the power of a machine. Some woodworkers use a hand lathe for hobby purposes. In production work, its value is limited. The primary occupational value of this machine is for the pattern maker, the model maker, the bowl turner and those who restore and rebuild antique furniture and wood artists.


There are many accessories that can be used on the wood lathe, not only for turning but also for buffing, grinding, horizontal boring, disk sanding, drum sanding, thread cutting, and routing spirals.


The six most common types of tools for woodturning are:


  • Gouges for rough turning and cutting stock to round shape

  • Skews for smooth cuts to a finished surface

  • Parting tools to cut a recess or a groove

  • Spear-point or diamond point to finish the inside of recesses or corners

  • Flat tools for scraping a straight surface

  • Round nose tools for scraping a concave recess and circular grooves


Measuring tools should include a rule, dividers, outside calipers, inside calipers and a depth gauge.


There are two basic methods of turning wood: cutting and scraping. Cutting tools include the gouge, skew, and parting tool, while the scraping tools are the flat nose, the round nose and the spear point. All of the cutting tools can also be used for scraping operations. In the cutting method, the outer skin of the wood is pierced and a shaving is peeled off. In scraping, the tool is forced into the wood so that particles are scraped away. When only a limited amount of turning is to be done, the scraping method is acceptable.


The two basic types of turning are spindle turning and faceplate turning. Turning with the stock held between the headstock spur-center, with the grain of the wood running with the axis of the lathe is called spindle turning. When the wood is screwed to the faceplate, usually, but not always, the grain of the wood is run 90 degrees to the axis of the lathe and this is called faceplate turning.


Bowls, platters and many other circular objects are turned on a faceplate. To do the turning, the wood is fastened to a faceplate and shaped by cutting and scraping the wood. Faceplates commonly used are the screw-center and standard faceplates of various diameters. The faceplates have screw holes for fastening the wood in place.


The first step in faceplate turning is to determine the size and kind of material needed. To make a larger bowl or platter, it is often necessary to glue up the stock. For a square object, carefully mount the wood on the faceplate. If the object is to be round, first cut the stock on a band-saw to a disk shape about one-quarter larger than the intended finished diameter and about one-quarter thicker. Then mount it to the faceplate.


If screw holes on the back of the bowl or platter are objectionable, cut a piece of scrap stock at least 1" thick and about the same size as the base of the project. Screw the faceplate to the scrap, glue the wood to be turned to the scrap, and you are ready to turn.


There are several ways of applying a finish to a turning. A simple method is to apply paste wax to a cloth and hold it to a revolving turning so that it is completely coated with the wax. After approximately 10 minutes, run the lathe at a slow speed and polish the surface with a soft, clean, dry cloth or paper towel. A second coat can be applied if needed, using the same method. To apply a French polish, fold a piece of linen cloth into a pad. Then add one teaspoon of shellac and add several drops of boiled linseed oil. Hold it to the revolving turning while moving the pad from side to side until the desired results are achieved.


Most importantly, have fun while turning!

Tuesday, March 22, 2011

Wood Finishes & Basic Uses

Wax
A very soft "finish" with minimal protective qualities. Best used as a polishing and preserving agent on top of other finishes or as a minimalist finish to preserve the natural color of wood.

Linseed Oil
A natural oil finish made from seeds of the flax plant. One of the least protective finishes but it is easy to apply and yields a beautiful hand-rubbed look. Like all oil finishes, it's best for items that are not subject to a lot of wear and tear.

Tung Oil
An ancient, natural finish made from nuts of the Tung tree. Slightly more water resistant and paler in color than linseed oil. Often used as the base oil component in other finishes. A good choice if you want the hand-rubbed look.

Oil-Varnish Blend
A very popular "hybrid" finish made by mixing a little varnish with a larger quantity of oil. Easy to apply like true oil finishes but with some of the protective qualities of varnish. Group includes antique oil, teak oil, Watco Danish oil, Nordic oil, Scandinavian oil, and various salad bowl finishes.

Shellac
One of the oldest and most under-appreciated of all finishes. More water and scratch-resistant than oil or oil/varnish-blends but not as protective as varnish or water-based finishes. Also dissolves in alcohol so not the best choice for bar tops. Comes in a variety of colors ranging from nearly transparent to orange/amber and is available in flakes or pre-mixed. Easily repaired and not as toxic as oil-based finishes.

Lacquer
Synthetic cellulose-based finish that is the finish of choice for many professionals. It dries fast, has decent protective qualities (somewhere between oil-varnish blends and varnish), provides excellent clarity and depth, rubs out well, and is fairly easy to repair. It also sprays very easily with great leveling properties. Available in several varieties including nitrocellulose (standard), and catalyzed lacquer (is available with the catalyst added). *see "Conversion" for post catalyzed finishes not used by the average woodworker.

Varnish
A very protective and durable amber-colored finish that holds up well to wear and tear, water, and solvents. Commonly available in three flavors, depending on the resin used alkyd, phenolic, or polyurethane. Negatives include long curing time, noxious fumes while curing, and poor repairability. Also yellows more over time so not the best choice for light-colored woods.

Water-Based
Good choice if you're looking for a non-yellowing finish that's safer for you and the environment. Decent toughness and scratch resistance but not as resistant to water, heat, and solvents as polyurethane varnish. First coat has tendency to raise grain. Water-based finishes typically cost more than their oil-based counterparts.

Conversion
Fast curing finish with excellent resistance to heat, wear, and solvents. Typically used for institutional furniture. Highly toxic solvent and formaldehyde fumes -- a professional grade spraying environment is essential. Cellulose Acetate Butyrate (CAB - expensive, tougher, and more resistant) falls into this category. Lacquers made from this very expensive resin are completely crystal clear and non-yellowing.

Wednesday, March 9, 2011

Handcut Dovetails - Why Bother?

Woodworking 101
Handcut Dovetails - Why Bother?
by Paul Rolfe (Sawdust, January 2001)

In Norm Abram's televised world of woodworking, nearly every task is performed with power tools, air tools, and jigs. It is a sharp contrast indeed to the woodworking world of Roy Underhill. On TV, Norm is always very calm in his very tidy shop and his joints fit perfectly every time. On the other hand, Roy is seen sweating, working from a very cluttered workbench and things don't always go together just right; but you get the idea just the same. So, here we have two very different approaches to woodworking. Is one way better than the other? Is one way faster than the other? The answers are maybe, and not necessarily.

Most people will agree that working with power tools, in most cases, is faster, requires less physical effort and produces more accurate, reproducible results. Woodworkers that still use traditional methods will tell you that they get tremendous satisfaction from performing tasks by hand. Using hand planes, handsaws, and brace and bits to shape the wood allows them to hear, feel and understand the natural material that they work with. Nowadays, furniture that is built using traditional techniques is perceived as being of high quality and thus valuable. But it is understandable that not everyone wants to take the time necessary to master the skills required. And then, if someone did have those skills, it just takes too long and too much effort to do things like surface and accurately dimension stock when there are tools like jointers, surface planers, and table saws around.

There is one traditional skill that can be easily learned and used in conjunction with modern techniques. That is cutting dovetail joinery by hand. Yes it does take some practice to get consistent results but it can add so much to a project. If you have a dozen or so drawers to build on a regular basis, buy an Omnijig, it does a fantastic job. But if you are building a blanket chest, jewelry box or highboy, try cutting the dovetails by hand. Why bother you say? I can only say, "Try it and you will see." Routers are very loud and big mess generating tools. In the time it takes to set them and the jig up, you could have been well on your way to getting the joints cut by hand and you wouldn't have had to deal with the noise and mess.

The only tools that you need are a good handsaw and couple of chisels. Other hand tools that are helpful are a marking gauge, and sliding bevel gauge or special dovetail marker. The secret to the simplicity of cutting the joints by hand is that you first cut one side, however you want to, and then use that half to mark the other half. So what if all the tails are not exactly the same size and perfectly spaced, that just adds to the uniqueness and charm of the joints. The only real requirement is that the joints have to fit well, and that comes with practice. So get started and have fun with them!

Thursday, May 13, 2010

Coated Abrasive Safety Guidelines

  1. Eye protection should always be worn when using any machinery-operated abrasive product (A.N.S.I. Standard Z87.1). Body protection should also be worn whenever appropriate; arm guards, leather gloves, and aprons. Loose clothing, jewelry and hair should always be secured before using any powered machinery.

  2. Machinery should always be maintained in good working order. Proper electrical controls should be easily reached and in good working order. Safety guards on machines should never be removed. Machinery should be disconnected from the power source before making any abrasive or machine adjustments.

  3. Proper dust control is essential. Always observe OSHA regulations regarding dust collection. Dust masks are recommended to minimize dust inhalation. Dust collection systems should be properly maintained and cleaned frequently.

  4. Never use a coated abrasive product which is cut, creased, or otherwise damaged. Observe proper storage conditions.

  5. Proper machinery use:
    • Always run lap joint belts in proper direction.
    • Jog the machine to start abrasive belt tracking, rather than full-power starts.
    • If unusual ticking or bumping noises are heard on a running abrasive belt, check belt and machine for possible damage.
    • On offhand applications, present the workpiece to the abrasive belt below the center of a contact wheel.
    • Proper belt tension should always be maintained.
    • Belt tracking should be properly adjusted.


Safety

Wednesday, October 14, 2009

Bill's Custom Woodworks

Master Craftsman Bill Rafferty handcrafts Curio Cabinets one at a time. Being in business for over 20 years, He offers the highest standard of quality control. Bill specializes in Curio Cabinets with mirror back & adjustable glass shelves popular with collectors and businesses for displaying collectibles. All Curio Cabinets are built from solid oak in the traditional style with modern day touches to showcase any collection in style. Color selections include Aged Oak, Dark Walnut, Golden Oak, Honey Maple, or White Wash.

Learn more about Bill’s Custom Woodworks by visiting him online @ http://www.billscustomwoodworks.com.

Wednesday, September 2, 2009

Sachs Woodcrafts Portfolio & Gallery


When you have a chance, browse to Sachs Woodcrafts online. You’ll see finely crafted products such as turned bowls, bottle stops, cutting boards, and much more. Each work of art is hand crafted and unique in expressing character and charm.

“The Bowl Man” as he is called, also accepts special requests, works with a wide array of wood species turning them into custom designs that make for a perfect gift. He obtains some of his supplies from our very own Klingspor’s Woodworking Shop in Raleigh!

Visit Sachs Woodcrafts and browse the Products, Gallery, Partners, or FAQs. You may even want to read or sign the guestbook.

Thursday, August 27, 2009

Troubleshooting Tips for Woodworkers

Loading Quickly


  • Excessive sanding pressure

  • Inadequate dust exhaust

  • Excessive belt speed

  • Moisture content of wood too high


Abrasives Dulling Prematurely


  • Grit too fine

  • Excessive sanding pressure

  • Wrong product for application

  • Belt too stiff for application


Streaking of Workpiece


  • Belt loaded or dull

  • Sanding pressure too high

  • Dust on workpiece

  • Overloading due to glue lines or pitch material on workpiece

Thursday, August 20, 2009

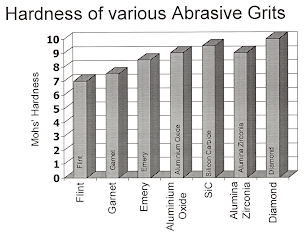
Abrasive Grit Chart

Click on the image to see it larger.

Miscellaneous Great Tips for Woodworkers


  • Sand lacquer finishes only after the 1st coat to remove dust nibs, runs, etc.

  • Sand lacquers also after the final coat to level the surface or as part of rubbing process if high gloss is desired

  • Sand varnishes such as polyurethane in between coats to give a rougher surface for the following coats to bond

  • Always sand with the grain

  • Wipe the surface of the work piece frequently with a soft, cloth or tack cloth

  • Use strong light to illuminate the work piece from an angle to see how the sanding is progressing

  • Keep sandpaper clean, either by belt cleaning stick or by tapping the sandpaper lightly

  • When sanding picture frames, sand the cross sections first, then sand the stiles

  • Final sanding on hardwoods is normally accomplished with 180 to 220 grit

  • Final sanding on softwoods is normally accomplished with 120 to 180 grit range

  • When bare wood sanding, moisten the wood with a wet cloth and allow the surface to dry

  • Do the final sanding, then raise the grain, and then sand again with the same grit

  • Sanding sealers should be sanded with zinc stearated Silicon Carbide in grit ranges of 220 to 320

  • Foam sanding pads, Mac Mops, non-woven abrasive pads also work well when sanding sanding sealers

Tuesday, July 21, 2009

General Applications for Coated Abrasives

Purpose of Sanding

  • Prepare the wood surface

  • Clean the wood surface

  • "Level out" the first coat of top coats

  • Promote good bond between coats on some type of finishes


Polishing

  • Final step in finishing using coated abrasives

  • 150 grit or finer

  • In woodworking, polishing is the final sanding of bare wood prior to staining or finish


Intermediate Sanding

  • Grit ranges from 50 to 120 grit

  • Stock removal is of medium quantity

  • Rule of thumb – Skip only one grit at a time


Rough Stock Removal

  • Woodworking requires dimensioning of lumber or glued panels to proper thickness

  • Grits 24, 36 and 40


Sanding of Penetrating Oils & Finishes

  • Bare wood should be sanded to at least 180 or 220 grit

  • Sanding beyond 220 will tend to burnish the wood surface

  • Pores will close and "slicken" the surface

  • Oil or stain penetration will decrease

  • Common to use 400, 600, 800, 1200 grit wet-or-dry Silicon Carbide sheets to "sand in" the oil or stain

  • Drives the stain or oil into pores of the wood and smoothes the wood surface as grain is raised

  • Grain raising is very common with water-based stains


Tips for Sanding Putty & Filler

  • Excess residue of fillers should be sanded with steel wool or a non-woven abrasive pad

  • After filler is fully dry, scuff sand with 220 grit Stearated sandpaper

  • On closed-grain woods, sand with 320 Stearate to reduce likelihood of cutting through the filler into bare wood

  • Putty should be sanded with 180 to 320 grit Stearated paper