What You See Is What You Do:
Creating amazing furniture pieces from things you see everyday. Read on do-it-yourself pioneers!What dreams may come
Have you ever seen something around your house, or while your out driving around
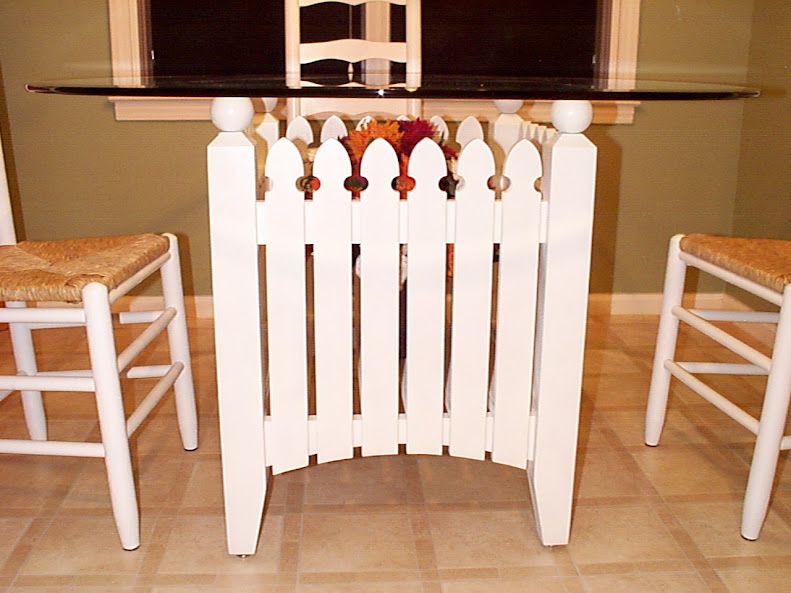
 and thought to yourself, "That would be a cool piece of furniture?" That happens to me all the time. I figured I was the only one who thought like this until a friend showed up with a picture of a picket fence with flowers in front of it and said, "I want a dining table that looks like this, can you build it?" Well, being I love a challenge, I said, "SURE CAN." I should have thought about my answer, but I couldn't resist an opportunity to challenge my creativity. I will have more on this later.
Know your limits
Ideas like the "picket fence table" might sound strange to some (and it really is), but I love breaking away from the norm. The key is to not limit yourself to "a set of plans in a magazine" or "an exact set of measurements taken from something someone else has already done." I don't mean to say that it's not good to reference plans or get the complete instructions from Norm Abram’s latest project, but if you love woodworking like I do, let the creative juices flow. You might find that you like your version (or vision) of a project better. That's why it's called custom woodworking.
Anyway, back to my picket fence table dilemma. My first problem was to figure out how in the world you make a nice inside dining table resemble something designed to keep your dog (or children) from terrorizing the neighbors? My answer came while I was driving. I noticed that most picket fences looked the same. Most were painted, had a specific design on the picket, a decorative top to the post, and were meant to look nice and welcoming from the outside. I knew then I could achieve all of these needs while transforming this fence into something that someone would look forward to eating from every day.
Sizing things up
I knew the size (height, width, & depth) the table needed to be, so I worked backwards from there. You will need to do the same thing with your project. Know what the final parameters are, then take your grand idea and convert it to meet your needs. I knew the common dimensions of the post size used for fences is a 4"x4" and pickets are usually 1"x4", so I scaled everything down from there.
 After much trial and error on paper and on patterns, I weeded out things that didn’t make this table a desirable family attraction. I didn’t like the flat, tapered post design, so I went with a ball topper instead. I also didn’t care for the flat look or simple bevel on the picket. I went with more of an arrow style with an arched bottom to mimic what is normally a design for the top of the fence. The customer originally just wanted the fence table, but what drew him to get a photo was the pleasant and welcoming appearance that the flowers in front of the fence gave. After discussing with the client, he (his wife actually) fell in love with the idea of creating a flower arrangement for the center piece inside the table. This was an indoor dining table, so they decided to use a fake flower setting that could be changed depending upon the mood or season.
Turning your dreams into reality
At this point it was time to take what were once merely thoughts on paper and transform it into reality. I cut the pattern for the pickets, milled them, and laid them out, striving for an aesthetically pleasing appearance that would fit the dimensions needed. I then screwed them on from the back, using round buttons (for decoration) to cover the holes. I placed slats with a small gap like the pickets as a shelf for the flowers (this was done in case they decided to use real ones that required water). I used a mortise and tenon joint to assemble the sides together and flattened the ball tops. Then I finished top off with a clear door bumper to keep the top from sliding. As you can see in the photos, it turned out quite nice and the customers loved it.
I have long since thought of modifications I could use to make the table better, such as a hinged panel to access the flowers easier, mounting the base on casters to make moving to other locations more accessible, and other random ideas that will have to wait for the next model to roll off the floor.
This project could have easily turned from a dream into a nightmare, but with patience and a willingness to adapt, it became one of my favorite projects. Who would think that an afternoon drive could lead to your next woodworking project? Let your imagination run wild with ideas and think about the whole project before you jump in too deep. If you hit a bump in the road (not just on your drive), step back and work through it. The end result will be one that you can be proud of and will take your skills to the next level.
About Chris Smith
Chris began his woodworking career early while in high school. With three years of woodshop class under his belt, he graduated in 1993 and then began work for a cabinet shop.
His work in the cabinet shop spanned over several years. He continued his skills in cabinetry on his own before joining Klingspor’s Woodworking Shop in 2001.
He found an immediate interest in woodturning while at Klingspor. But, for Chris, it is more than just woodturning as he finds enjoyment in all aspects of woodworking. He has a wealth of 20 years experience in cabinetmaking, furniture building, woodturning, and more.

No comments:
Post a Comment