Wednesday, June 5, 2013

Nice Curves Part 1


Nice Curves:

Sanding contour shapes with ease.
Presented by Chris Smith

Have you ever met the frustration of having to sand raised panel doors, or the multi-profiles of crown and other types of molding? Or maybe you have had to grab a dowel and wrap it with sandpaper and fight to sand the flutes of a column. Regardless of the project, there is almost always some part of it that requires sanding of contours or needs special attention that a disc or sheet sander won’t give. It is always the most dreaded part of the project because it usually means elbow grease and time. And it is usually at this point in the project you are ready to be done, but it is also the part of the project that can make or break all the work and time you have invested. If your project has a bad sanding job it can reveal itself when the finish is applied, which we have all experienced at least one time. Sanding contours doesn’t have to be a burden. In this article you will learn easier and in most cases better ways to sand those odd shapes with ease.

Klingspor's Woodworking Shop understands the need for specialty abrasives to achieve a high level of speed and quality when sanding. This is why we have devoted an entire section to Contour sanding on our website. The following is a list of items perfect for a variety of contour sanding and shaping needs.

MAC MOPS are perfect for turnings, carvings, chair arms and legs, balusters, and other shaped and contoured parts. They can be sanded easier, better, and faster when using the Mac Mop. It consists of hundreds of strips of flexible sandpaper that are bonded to a strong epoxy core. These small strips, made from our cloth-backed Aluminum Oxide material quickly find their way into all the recesses in your piece. Due to the nature and design of the Mac Mop, the sanding action is very passive and will sand, polish, and defuzz your work without affecting or altering any of the profile. The Mac Mop will definitely improve the finish stages of your project by sanding off all the loose fibers that have been pressed into the wood during previous milling or sanding applications. They will work great on larger projects like table legs or crown molding and will also work equally as well on smaller projects. This will, in turn make for a smoother first coat of finish to build on. Simply consider this the best profile sanding device on the market today. We offer the Mac Mops in a 10"x2" and a 10"x4" size and in 80, 120, and 180 grits.

Mac Mops should be mounted onto stationary machines with motors ranging from 1/2 hp to 3 hp and shafts of at least 1/2" diameter and long enough to allow the mop to be mounted. Ideal speeds for the Mac Mop are between 1,100 and 2,500 rpm's but should never exceed 3,400 rpm's. The mops are available in kits that include mounting plates to fit most any size mandrel or arbor ranging from 1/2" to 1-1/2".

SPINDLE MOUNTED SANDING MOPS are a smaller version of the MAC MOP, but come mounted on a 1/4" spindle. With these sanding mops, the most severe shapes and profiles can be sanded with ease. Best of all, no fancy equipment is needed to use them; any 1/4" tool will work. Hundreds of abrasive "fingers" find their way into hard-to-reach nooks and crannies to give the best possible sanded finish. Simply chuck into a 1/4" drill and you're ready to go. They offer the same sanding versatility as their bigger counterpart, but because they are able to be chucked into a variety of other tools and machines, they make a great addition to the home shop as well as the professional cabinet shop.

The mops are 7" inches in diameter and are available in 1" and 2" widths. With a variety of grits ranging from 80, 120, 180, and 240, any job can be sanded from the first pass to the finish.

GOLD SANDING MOPS (also known as flutter sheets) are perfect for the medium to smaller profile sanding needs like parquetry, scroll work, moldings, carvings, etc. They are a smaller version of the Mac Mop and Spindle Mounted sanding mop. If you have ever asked yourself, "How do I sand a profile without changing the shape?" Well, the Sanding Mop Kit is the answer. Woodworkers from across the country that have tried the gold mops will tell you that this is the very best contour sanding system on the market today. They are made of the most flexible aluminum oxide cloth available with lubricants and special resins added. You'll be amazed at the time you will save and the finish in which you can achieve. The fingers of the gold mops will act like a chamois in a car wash and find the low spots, leaving contours and profiles sanded smooth top to bottom, without ruining any detail. You can build the perfect sanding mop for your specific profile sanding needs by adding or taking away sheets. This is a must have for all woodworking shops. They have a 1/2" hole in the middle and can be mounted to any number of mandrels that fit drill presses, motor arbors, hand drills, flex shafts and more.

The Gold mop is perfect for sanding the multi-profile design of crown molding, edge molding, beads, coves, panel doors, and much more. The profile sanding possibilities are endless because of this unique finger design. The sanding mop refills come in packs of 48 sheets that are placed on the mandrel in an intersecting pattern by placing two sheets back to back on the mandrel. Then, place two more sheets back to back and install on them mandrel, intersecting the previous sheets making a cross. Continue installing the sheets on the mandrel in this back to back method, with each layer crossing the other in a pin wheel design until the desired thickness is achieved. The easy to follow instructions (Link is a PDF download file. Requires Acrobat Reader, a browser plug-in, or third party software to view) can be downloaded from the Klingspor’s Woodworking Shop website. You can use small spacers between the sheets to allow for more flexibility of the mops or to increase the width. The sanding mops are available in two sizes (1"x4" and 2"x6") and in grits ranging from 80 to 320. For best results, don’t exceed 2300 rpm when using these mops.

SANDING STARS are a smaller version of the Sanding Mop and come preassembled on a 1/4" mandrel. Put these to work on your most severe profiles, radiuses, routed edges and carved surfaces. The "Sanding Star" is made of the Klingspor gold material - an extremely flexible, cloth-backed aluminum oxide abrasive with a special dry lubricant applied. This special "golden" material is excellent for finish-sanding in general, but perfect for those tough-to-reach areas you never thought you would be able to sand. The sanding Stars are 4” in diameter and 1/2" to 3/4" in thickness and are available in grits ranging from 80 to 220. This size allows you to reach into tighter areas than the previously mentioned profile sanding products.

Hey, stick around...there's more of this article coming next month!...To be Continued...

In the meantime, enjoy a video presented by Chris Smith about Mac Mops!


About Chris Smith
Chris began his woodworking career early while in high school. With three years of woodshop class under his belt, he graduated in 1993 and then began work for a cabinet shop.

His work in the cabinet shop spanned over several years. He continued his skills in cabinetry on his own before joining Klingspor’s Woodworking Shop in 2001.

He found an immediate interest in woodturning while at Klingspor. But, for Chris, it is more than just woodturning as he finds enjoyment in all aspects of woodworking. He has a wealth of 20 years experience in cabinetmaking, furniture building, woodturning, and more.

Friday, February 15, 2013

Creating Amazing Furniture


What You See Is What You Do:

Creating amazing furniture pieces from things you see everyday. Read on do-it-yourself pioneers!


What dreams may come
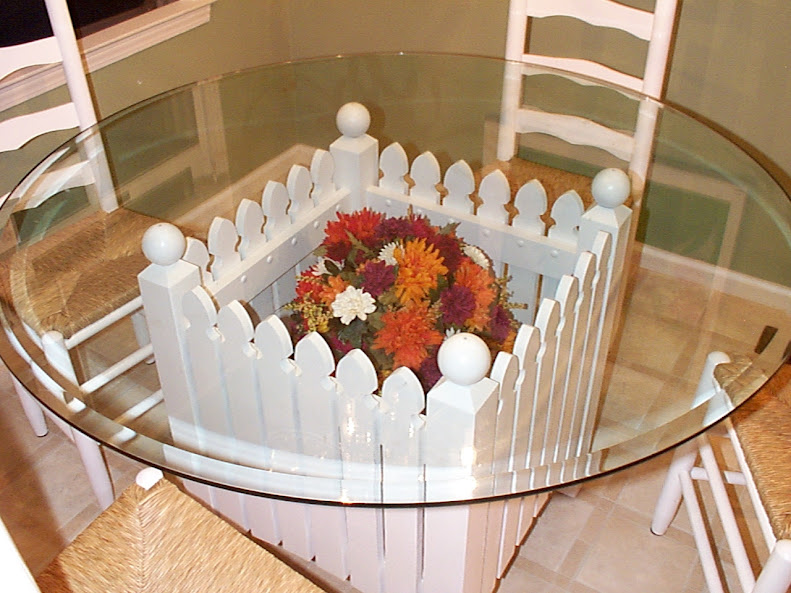
Have you ever seen something around your house, or while your out driving aroundTable and thought to yourself, "That would be a cool piece of furniture?" That happens to me all the time. I figured I was the only one who thought like this until a friend showed up with a picture of a picket fence with flowers in front of it and said, "I want a dining table that looks like this, can you build it?" Well, being I love a challenge, I said, "SURE CAN." I should have thought about my answer, but I couldn't resist an opportunity to challenge my creativity. I will have more on this later.

Know your limits
Ideas like the "picket fence table" might sound strange to some (and it really is), but I love breaking away from the norm. The key is to not limit yourself to "a set of plans in a magazine" or "an exact set of measurements taken from something someone else has already done." I don't mean to say that it's not good to reference plans or get the complete instructions from Norm Abram’s latest project, but if you love woodworking like I do, let the creative juices flow. You might find that you like your version (or vision) of a project better. That's why it's called custom woodworking.

Anyway, back to my picket fence table dilemma. My first problem was to figure out how in the world you make a nice inside dining table resemble something designed to keep your dog (or children) from terrorizing the neighbors? My answer came while I was driving. I noticed that most picket fences looked the same. Most were painted, had a specific design on the picket, a decorative top to the post, and were meant to look nice and welcoming from the outside. I knew then I could achieve all of these needs while transforming this fence into something that someone would look forward to eating from every day.

Sizing things up
I knew the size (height, width, & depth) the table needed to be, so I worked backwards from there. You will need to do the same thing with your project. Know what the final parameters are, then take your grand idea and convert it to meet your needs. I knew the common dimensions of the post size used for fences is a 4"x4" and pickets are usually 1"x4", so I scaled everything down from there.

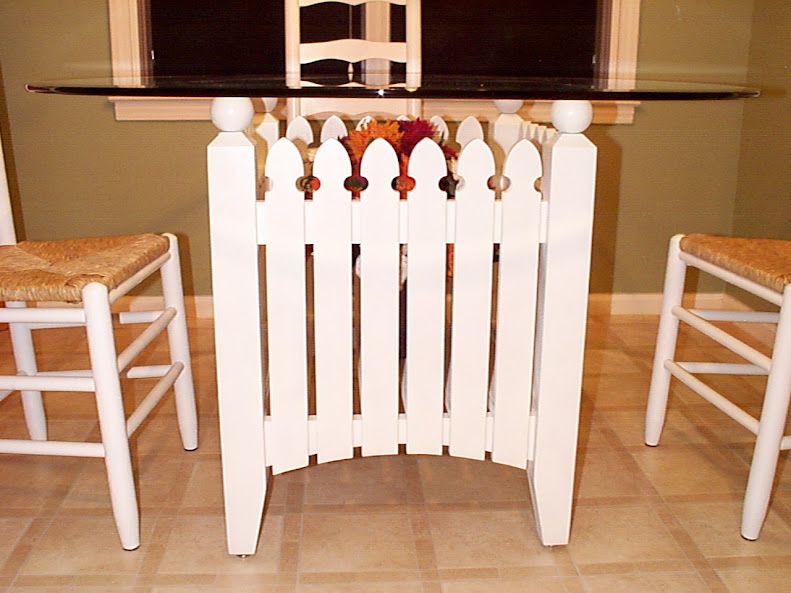
Table After much trial and error on paper and on patterns, I weeded out things that didn’t make this table a desirable family attraction. I didn’t like the flat, tapered post design, so I went with a ball topper instead. I also didn’t care for the flat look or simple bevel on the picket. I went with more of an arrow style with an arched bottom to mimic what is normally a design for the top of the fence. The customer originally just wanted the fence table, but what drew him to get a photo was the pleasant and welcoming appearance that the flowers in front of the fence gave. After discussing with the client, he (his wife actually) fell in love with the idea of creating a flower arrangement for the center piece inside the table. This was an indoor dining table, so they decided to use a fake flower setting that could be changed depending upon the mood or season.

Turning your dreams into reality
At this point it was time to take what were once merely thoughts on paper and transform it into reality. I cut the pattern for the pickets, milled them, and laid them out, striving for an aesthetically pleasing appearance that would fit the dimensions needed. I then screwed them on from the back, using round buttons (for decoration) to cover the holes. I placed slats with a small gap like the pickets as a shelf for the flowers (this was done in case they decided to use real ones that required water). I used a mortise and tenon joint to assemble the sides together and flattened the ball tops. Then I finished top off with a clear door bumper to keep the top from sliding. As you can see in the photos, it turned out quite nice and the customers loved it.

I have long since thought of modifications I could use to make the table better, such as a hinged panel to access the flowers easier, mounting the base on casters to make moving to other locations more accessible, and other random ideas that will have to wait for the next model to roll off the floor.

This project could have easily turned from a dream into a nightmare, but with patience and a willingness to adapt, it became one of my favorite projects. Who would think that an afternoon drive could lead to your next woodworking project? Let your imagination run wild with ideas and think about the whole project before you jump in too deep. If you hit a bump in the road (not just on your drive), step back and work through it. The end result will be one that you can be proud of and will take your skills to the next level.

About Chris Smith
Chris began his woodworking career early while in high school. With three years of woodshop class under his belt, he graduated in 1993 and then began work for a cabinet shop.

His work in the cabinet shop spanned over several years. He continued his skills in cabinetry on his own before joining Klingspor’s Woodworking Shop in 2001.

He found an immediate interest in woodturning while at Klingspor. But, for Chris, it is more than just woodturning as he finds enjoyment in all aspects of woodworking. He has a wealth of 20 years experience in cabinetmaking, furniture building, woodturning, and more.

Tuesday, January 15, 2013

Little Shop of Horrors Part 3


Little Shop of Horrors:
Shop Safety

This is the third and final part of the Little Shop of Horrors. Hope you enjoy!


Using the great line that Norm Abrams made popular at the start of his show The New Yankee Workshop, "Before we use any power tools, let's take a moment to talk about shop safety. Be sure to read, understand, and follow all the safety rules that come with your power tools. Knowing how to use your power tools properly will greatly reduce the risk of personal injury. And remember this: there is no more important safety rule than to wear these - safety glasses." This is inevitably the most overlooked part of setting up a shop, but yet probably the most important. What good is a shop full of tools if you are injured and can't use them? You should keep this in mind when purchasing tools and machines.

Several years ago a man named Steve Gass saw the need for a safer table saw, so he set out to create one. He succeeded and now the SawStop is one of the top selling saws in the U.S. If you haven’t heard about this tool then you need to check them out at sawstop.com. It uses flesh detecting technology that will recognize your fingers if they touch the blade and will totally shut down and the blade will drop below the surface of the table, saving you the loss of a finger and a trip to the emergency room with months of physical therapy. I have demoed this machine myself many times (using a hot dog, not my finger) and it has impressed me every time and never failed to do what it says. Klingspor’s Woodworking Shop offers this saw, in all its models, through our retail stores only.

Machines aren't the only area of safety that needs to be reviewed. There are many areas we need to be safe and protect ourselves. No more important safety rule...safety glasses. I have been to the eye doctor many times due to metal, wood, or other foreign objects stuck in my eye, which I couldn't get out. When I was younger, my dad was pulling rusty nails out of some boards and one came out and flew across the driveway and hit me in the eye. I couldn't see out of it for days. You would have thought I would have learned my lesson, but it took me a long time, as I am very stubborn, to realize I need to protect my eyes and ears. I now where safety glasses anytime I am in the shop working or doing any type of work overhead, like working under a sink or on a ceiling. Keeping your eyes safe should be very important to you.

Using machinery or power tools can affect your hearing too. Routers, planers, and jointers can be very loud and can contribute to hearing loss, so be sure to have some hearing protection available.

There are many other areas in which you should consider using safety aids, such as while working with a table saw or other machines. Please use the guards that came with your tools, as well as push sticks, feather boards, etc.

Other safety items include dust masks, face shields, gloves, aprons, etc. Please check out our full line of safety equipment and accessories on our website.

In conclusion
Don’t make excuses about not having room for tools. Just get creative and make your shop size work for you. When setting it up do a lot of research to find the tools and machines that are right for you. And always use safety equipment to protect yourself from injury. I worked in our Hickory retail store for over ten years and saw a LOT of different types of injuries from people performing stupid, unsafe operations. I also saw some accidents that occurred simply because the wood or the tool did something unexpected. So be safe and have fun.

Good luck and happy woodworking.

About Chris Smith
Chris began his woodworking career early while in high school. With three years of woodshop class under his belt, he graduated in 1993 and then began work for a cabinet shop.

His work in the cabinet shop spanned over several years. He continued his skills in cabinetry on his own before joining Klingspor’s Woodworking Shop in 2001.

He found an immediate interest in woodturning while at Klingspor. But, for Chris, it is more than just woodturning as he finds enjoyment in all aspects of woodworking. He has a wealth of 20 years experience in cabinetmaking, furniture building, woodturning, and more.
Wednesday, January 9, 2013

Walking Sticks & Slingshot

Many thanks to Jeff Pack (Wood Works) Dallas , NC for sharing his customer projects with us! He shared with us a Wizard face Slingshot and Vine Twisted Walking Sticks. Enjoy his creativity and talent below.

Tuesday, December 18, 2012

Little Shop of Horrors Part 2


Little Shop of Horrors:
Which shop machines are a must?

This is the second part of the Little Shop of Horrors. Hope you enjoy!


This is a tough question and will depend greatly on what type of shop you are setting up. If you plan on setting up a basic shop to build cabinets or furniture, you will need different tools than you would need if you’re just setting up a shop for carving or doing metal work. In this article we will discuss setting up a basic woodworking shop for building a wide variety of projects from whirligigs to kitchen tables or other furniture.

The main tools you will need are a tablesaw, which will be the primary tool in your shop so don't skimp on this tool by buying a cheap model (not necessarily price, but quality) with a shortage of horse power and an inaccurate fence. The entire shop should be built around your tablesaw as it will get used more than any other tool you own. You will also need a jointer, planer, a bandsaw, and a drill press. The bandsaw and drill press can be a bench top version depending on your needs. Most projects can be built using these basic machines. You may be saying to yourself that, "You can use a planer as a jointer or vise versa," but that is just not the case. These tools were not designed that way. You can't mill to a specific and consistent thickness using a jointer and you can't square and flatten stock using a planer. There are many other machines that a shop would benefit from, such as a drum sander, dust collector, which we will discuss further, a wood lathe, and the list goes on.

If your shop is in your basement or an attached garage then you will definitely want to look at some type of dust collection as dust will ALWAYS find a way to migrate into your home. This was a sore spot for me as my wife didn’t like that part of my home shop at all. The beauty of that though, was the frustration she had regarding dust enabled me to remedy that if she would "allow" me buy a new tool. Not long after that I had new 1-1/2hp dust collector and an air filtration unit, which hung from the ceiling. I never would have dreamt my wife would have actually requested that I buy new tools because in her mind I had more than I needed. But after some discussion she relented and was pleased with the dustless outcome. Having this dust bagged and filtered served as a good safety measure as well, which is another important feature for any shop. Dust collectors come in a wide range from your basic "shop vac" to a large horse power cyclone unit. Again, shop size plays a factor in your decision. You will also have to decide whether or not you will move the dust machine around or place it in a corner and run dust hose around the shop to each machine. The latter is more efficient if it's an option for you. You won't have to keep connecting to one tool and then taking off the hose, going to the next machine and then repeat, which can become a hassle - trust me. Plus, it frees up floor space not having the dust collector following you around while you're working. Besides not breathing in that dust and having a dust-free shop when it comes time to finishing a project is a huge plus, as you won't have to worry about the dust settling on the piece while finish dries.

Other necessary shop tools & accessories


Besides the bigger machines for your shop, you will also need a few power tools, hand tools, and other basic shop helpers as well. The list and use for each would be as follows:
  • Circular saw for trimming and precutting larger sheets of plywood.
  • Chopsaw for cutting parts & molding.
  • Router and a variety of bits for edge profiling, grooving, making doors, etc. (usually a smaller 1-1/2 to 2hp for hand work and a 3hp for use in a router table). Next to the tablesaw, a router will probably be the most frequently used tool in your shop.
  • Hand drill for drilling, some assembly, and hanging doors (corded are typically stronger but cordless are more convenient).
  • Jigsaw for cutting a radius and notching out.
  • Sanders (1/4 sheet, 1/2 sheet, disc, and/or a belt disc combo) for rough to finish sanding and shaping.
  • Clamps for holding projects together while the glue dries ("You can never have enough clamps" is an old saying which holds a lot of truth).
  • Hand tools like a set of chisels, a mallet, tape measure, hand planes, calipers, dividers, etc.


The above list is basic and short, but the list of tools at your disposal is very, very long. If driving nails with a hammer isn't your thing then you will want to look at a small pancake air compressor and a brad gun. Depending on whether you plan on spray finishing or not will determine the size of your air compressor, unless of course, you will be using a HVLP unit. If you plan on using a spray gun then you will want a larger compressor, at least 4-5hp and up, to provide the needed requirement of continuous air to supply that spray gun. Don’t forget that you will have to put a finish on those projects, so make sure your shop has room to store and apply finishes, brushes, and solvents.

About Chris Smith
Chris began his woodworking career early while in high school. With three years of woodshop class under his belt, he graduated in 1993 and then began work for a cabinet shop.
His work in the cabinet shop spanned over several years. He continued his skills in cabinetry on his own before joining Klingspor’s Woodworking Shop in 2001.
He found an immediate interest in woodturning while at Klingspor. But, for Chris, it is more than just woodturning as he finds enjoyment in all aspects of woodworking. He has a wealth of 20 years experience in cabinetmaking, furniture building, woodturning, and more.

Native American Style Drone Flute


(Click on the image to see it larger)
Enjoy this talented work from Bob Child of Ugly Boy Flutes in Waynesville, NC. This is an A4 Native American style drone flute. A quote from Bob, "Most phenomenal piece of curly/figured White Oak I've ever laid eyes on!"

Thanks for sharing Bob!

Wednesday, November 28, 2012

Cinderella's Carriage


Thanks to Roy W. for submitting his customer project to us! What a beautiful wooden Cinderella Carriage. Note: Click the image to see it larger. 

Friday, November 16, 2012

Little Shop of Horrors Part 1


Little Shop of Horrors:
Setting up shop in small space

Little Shop of Horrors will be presented in 3 parts. Hope you enjoy!


I know we all want a huge shop with a milling room, a work room, and a finish room, but most likely that’s not what you have. I remember the first shop I had was half of a two car garage. We (my wife) parked on one side and my shop was set up on the other, which meant my truck was outside. I just couldn’t convince her to park outside with me so I could have the whole shop, or garage, to myself (hard to believe, I know). I started out with a Shop Smith and a couple power tools and slowly progressed to designated tools, all on mobile bases or carts, until finally, I had all the tools I wanted (I thought).

Setting up shop in a small space doesn’t have to be an event that you dread. There are just a few things you need to do to make it work to your advantage. Hopefully, this will help give you a plan to follow that will get you started in your shop.

Where to start:
Before you go out and buy your dream tools, which I would love to sell you, be sure that you have room for them all. It would be bad for your shop, and wallet, if you had all those tools and nowhere to put them. In an ideal shop there is room for all the tools you will need and more, regardless of the type of shop you’re setting up (cabinet shop, machine shop, carving, turning, etc.). Space is always the biggest factor, so setting it up with the best overall efficiency is paramount.

The best thing to do before laying out your shop is to think about a project from start to finish (from rough lumber to the final top coat) and how each of the steps in between will be handled. Mobile bases on your tools and benches will be crucial to setting up a small shop, so that things can be rolled out for use and back in with minimal time and setup. Figuring out how much space each tool, workbench, lumber, etc. will take up can be confusing. Not to mention a pain in the back if you just bought the tools and shuffled them around several times until you got the layout you wanted.

Scaling it out on paper or the computer
Start by laying out your shop to scale on paper, or if your web savvy, try using an online planner like the one found on the Fine Woodworking website or Google Sketch. You can also use Photoshop, Microsoft Word, or any other similar software as well. If the web and computer programs aren't your thing just graph out your shop & tools the old fashioned way, to scale on graph paper. Once everything is to scale, cut out the tools and play around with the design, moving the templates around the scaled floor plan of your shop to find the best "flow" that works for your situation.

*Important tip - When you are laying out the shop, be sure to allow room for the infeed, outfeed, and side-to-side cutoff of your lumber. Utilize open garage doors as one way of helping to accomplish this. The tablesaw for instance will seem like it requires an airport runway at times, but with proper layout, taking advantage of those open doors, you can allow for plenty of room. It would be a nightmare if you had room for your tools but not be able to actually use them.

Groups of tools & support
Grouping tools by what they do in regards to the project flow can save a lot of time. If your shop is designated and does not double as your parking spot, then this will make things much easier when you are in the middle of a project. For example, if your lumber rack is near the milling machines – Jointer, planer, and table saw, as opposed to the other end of the shop, then you can get right to work without maneuvering 8’ lumber or sheet goods from one end of the shop to the other, bumping into benches and other tools. Put your machines that are used in a sequence near each other as well. Grouping those milling tools close to each other you can go from one step to the next without a lot of travel. For example: You know you will start with a jointer to flatten, straighten, and square a side and face of a board. Then that board will go to the planer to be milled to thickness. Once milled to thickness, you take it to the table saw to cut it to width and then back to the jointer for a final pass on the side recently cut off. After all that work, you don’t want to have those three tools in different parts of the shop.

Also, allowing for a tool or bench to serve multiple functions can be a huge space and time saver. In the early days of my small shop I had a bench top planer and jointer that I bolted to a mobile cabinet I made, which had a rotating table using a 1" dowel as a pivot hinge. I had a tool on each side, so I unlocked the corners and flipped the table over depending on which tool I needed, and then locked the corners again using eye bolts and plastic knobs. I could change it easily in less than thirty seconds and didn't have to change my dimensional setup on each tool, saving me a lot of time.

Removing the fence, lowering the blade, and placing a piece of plywood on your tablesaw can make for a great assembly table or sanding table. Yes, I said the usually dreaded word, "sanding". Sanding and finishing can make or break a project. If you spend a great amount of time milling and building to precision, you don’t want to ruin your project by a poor sanding or finishing job.

There are several ways of utilizing tools for multipurpose use. Another example is if you build your workbench so it can also serve as an outfeed table support for your tablesaw, this will take up less room than having a designated support table. Speaking of support tables; be sure you have them. In almost all cases, you will be alone in your shop and safety is very important. Don’t attempt to be a hero and muscle around heavy plywood without some support, as it could result in a bad cut on the wood or worse, your finger.

Multifunction tools and storage
You can build storage under the right table board of your tablesaw and utilize that as storage for blades, wrenches, featherboards etc. I built such a cabinet for mine and put a small tray on top to hold pencils, push sticks, and an extra tape measure, which I always seemed to misplace. I had a router table mounted on the left side of my saw that was made of cast iron which replaced my left table extension. With all these additions plus a mobile base, my tablesaw transformed from "just" a tablesaw, into a space-saving mobile mega tool that was a tablesaw, a router table, and a storage center, all on wheels for easy maneuvering.

Storage is a premium so make sure to utilize the space you do have as much as possible. It will allow you to keep your hand tools, finishes, fasteners, etc put up and out of the way so there is room to actually use your work surfaces. It will also help protect those items from being damaged while not in use. You can cut out a portion of a counter or bench and put smaller power tools, like grinders, miter saws, bench top belt sanders, etc on a wood base that will fit into that cutout. This will allow for quick change of tools and allow them to again be stored on a shelf when not in use.

Making a lumber rack on the wall, or even better from the ceiling above the garage door, to stack your various species of wood will also help in creating less clutter around the shop. Be sure that your rafters will support the extra weight if you use this method. You can also make a bin or use a barrel to put the smaller sticks of lumber that you just can’t bring yourself to throw out.

Many manufacturers of tools have seen the need to help out the small shop by making multipurpose machines. There are both positives and negatives to these tools. If you have a small shop there can be many benefits, as space is a premium. If you are setting up your shop and will be cutting sheet goods and milling many different parts, multifunction machines may not always be the best choice. Many of these machines have to be totally changed and readjusted to transform into another tool. My first machine was that way. Some of its features enabled it to be used as a tablesaw, bandsaw, drill press, wood lathe, & horizontal boring tool. Plus it had other attachments available that I didn’t own. The demo guys you see at shows often make it look quick and simple, but in reality it took a good bit of time. If I forgot to make a cut, it then required me to set it all back up again and hopefully recreate the exact same dimensions. This is just a small sacrifice though if you are working in a limited space.

Also, many of these machines work great in one area but not in another. For instance, I am a bit on the short side and when I used the table saw on my multi-machine, it was uncomfortable because the table was high and top heavy, which made it difficult to cut plywood safely to width without first precutting it using a circular saw to make it more manageable, which in my opinion defeated the purpose of having a tablesaw. If small crafts is your primary use of a tool like this then that won’t bother you at all.

Tools like the one Jet puts out, which is a combo planer/jointer , is a very nice tool to have around. It performs nicely during use of both operations. The industrial 12" model has a 3hp motor (FYI - the 3hp version is NOT ideal for a small shop, but will work well if you have the room). We will discuss types of tools needed in your shop a bit later, but I wanted to get you thinking about ways to utilize things in a way to serve more than one purpose.

About Chris Smith
Chris began his woodworking career early while in high school. With three years of woodshop class under his belt, he graduated in 1993 and then began work for a cabinet shop.
His work in the cabinet shop spanned over several years. He continued his skills in cabinetry on his own before joining Klingspor’s Woodworking Shop in 2001.
He found an immediate interest in woodturning while at Klingspor. But, for Chris, it is more than just woodturning as he finds enjoyment in all aspects of woodworking. He has a wealth of 20 years experience in cabinetmaking, furniture building, woodturning, and more.

Tuesday, October 30, 2012

Are You Finished Yet?


Here is a look at the most common finishes used before you "finish" your project. Hope you enjoy!

Wax
A very soft "finish", which offers very little protection. It is best used as a polishing and preserving agent on top of other finishes or as a finish to preserve the natural color of the wood.

Linseed Oil
A natural oil finish made from the seeds of the flax plant (the same plant that is used to produce flaxseed oil, which is found in health food stores & used to help prevent heart disease and arthritis. However, linseed oil is NOT edible as it contains other chemicals to aid in the drying process). It is one of the least protective finishes, but it is easy to apply and yields a beautiful hand-rubbed look. Like all oil finishes, it's best for items that won’t see a lot of wear and tear.

Tung Oil
A very old, natural finish made from nuts of the Tung tree, which grows in the eastern Asia. Slightly more water resistant and paler in color than linseed oil. Often used as the base oil component in other finishes. Also a good choice if the hand-rubbed look is what you're after.

Oil-Varnish Blend
A very popular "hybrid" finish made by mixing a little varnish with a larger quantity of oil. It is easy to apply like true oil finishes but with some of the protective qualities of varnish. Some types include antique oil, teak oil, Watco Danish oil, various salad bowl finishes and some home-made versions.

Shellac
One of the oldest and most under-appreciated of all finishes. Shellac is a resin secreted by the female lac bug on trees in the forests of India and Thailand. It is processed and is available in a variety of colors ranging from nearly transparent to orange/amber and is available in flakes or pre-mixed. It dissolves in alcohol or Behkol and is similar in scratch-resistance as oil or oil/varnish-blends but not as protective as varnish or water-based finishes. It's easily repaired and not as toxic as oil-based finishes. Interesting fact about shellac is that it is also used as a food and candy glaze and was used in making old phonograph records.

Lacquer
A synthetic cellulose-based finish that is the finish of choice for many professionals. It dries fast, has decent protective qualities (somewhere between oil-varnish blends and varnish), provides excellent clarity and depth, rubs out well, and is fairly easy to repair (we offer a variety of colors in aerosol toners for easy touch-up). It also sprays like a dream with the proper equipment. It's available in several varieties including nitrocellulose, CAB-acrylic, catalyzed (pre-cat & post cat), & water-borne. Pre-cat & post-cat simply means the hardener is either mixed in before, or after you get it. The most popular type used is the pre-cat. It can also be tinted slightly using toners or dyes for a deeper appearance.

Varnish
A very protective and durable, amber-colored finish that holds up well to wear and tear, water, and solvents. It's commonly available in one of three ways, depending on the resin used; alkyd, phenolic, or polyurethane. Negatives include a longer curing time, strong fumes while curing, and poor reparability. It also yellows more over time so it's not the best choice for light-colored woods.

Water-Borne
A good choice if you're looking for a non-yellowing finish that's safer for you and the environment. It has decent toughness and scratch resistance but not as resistant to water, heat, and solvents as standard varnish. The first coat has a tendency to raise the grain of the wood, which can be frustrating, especially if you are staining. Water-based finishes typically cost more than their oil-based counterparts. Due to new Volatile Organic Compounds laws (known as VOC), more and more finishes are now being made with a water base to them.

Conversion
A fast curing finish with excellent resistance to heat, wear, water, and solvents. Typically used for institutional furniture. Highly toxic solvent and formaldehyde fumes - a professional grade spraying environment is essential.

For a more in-depth look at finishing, check out the following books and videos: New Wood Finishing Book, Understanding Wood Finishing, & Refinishing Furniture DVD. For a complete listing of all of the finishing products we have available and get that project "finished."

About Chris Smith
Chris began his woodworking career early while in high school. With three years of woodshop class under his belt, he graduated in 1993 and then began work for a cabinet shop.

His work in the cabinet shop spanned over several years. He continued his skills in cabinetry on his own before joining Klingspor’s Woodworking Shop in 2001.

He found an immediate interest in woodturning while at Klingspor. But, for Chris, it is more than just woodturning as he finds enjoyment in all aspects of woodworking. He has a wealth of 20 years experience in cabinetmaking, furniture building, woodturning, and more.

Wednesday, October 3, 2012

Customer Project

Puzzle Rocking Chairs by Warren T. Lowe was submitted to us recently. Nice work!


Thursday, August 30, 2012

Wood Finishing Advice & Tips

Every WOODWORKER knows that WOOD FINISHING is the most important part of the project. We’ve compiled a list of WOOD FINISHING advice & tips. We hope the list will give you added knowledge for your future woodworking projects!

Do you have any tips not listed here that you would like your fellow WOODWORKERS to know about? If so, leave it in the comments section!

  • Remove glue splotches before staining (stain will not color glue).
  • Use a low-angle light to identify glue splotches and blemishes.
  • Seal resinous knots with a shellac-based sealer, such as Bullseye SealCoat
  • Apply a filler, such as Behlen's Por-o-pac to open-grain woods (e.g., oak) for the smoothest possible finish.
  • Use a test strip of wood to check the color and quality of the stain and top coat finish.
  • Reduce stain splotching in pine by applying a "washcoat" sealer or a gel stain.
  • Sponge wood and re-sand when dry to minimize grain-raising from water-based finishes.
  • Sand end grain to a finer grit to prevent excessive stain darkening (or use gel stain).
  • Apply a "washcoat" to end grain to prevent excessive stain darkening.
  • Finishes containing oil (including varnish) yellow over time.
  • Most woods darken as they age.
  • Arrange pieces horizontally to reduce runs and sags (especially when brushing).
  • Use shellac or lacquer if reparability and reversibility are most important, as these types of finishes allow for easier repair.
  • Use water-base finish for low toxicity, non-yellowing, and ease of clean-up.
  • Use lacquer or dewaxed shellac for the best clarity and rubbing qualities.
  • Use pure oil finishes for the "natural" look (at the expense of protection).
  • Use polyurethane if you want an inexpensive, very durable, very protective finish.
  • Use spar varnish, paint, or outdoor specific oils for the most durable outdoor finishes.

About Chris Smith
Chris began his woodworking career early while in high school. With three years of woodshop class under his belt, he graduated in 1993 and then began work for a cabinet shop.

His work in the cabinet shop spanned over several years. He continued his skills in cabinetry on his own before joining Klingspor’s Woodworking Shop in 2001.

He found an immediate interest in woodturning while at Klingspor. But, for Chris, it is more than just woodturning as he finds enjoyment in all aspects of woodworking. He has a wealth of 20 years experience in cabinetmaking, furniture building, woodturning, and more.